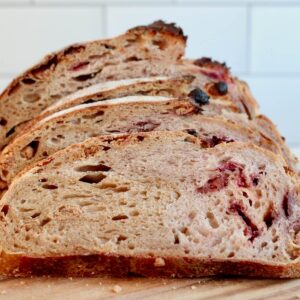
This Maple Oat Sourdough Bread is naturally sweetened with maple syrup, extra soft and chewy from rolled oats, and an easy, beginner-friendly step up from plain loaves.

I love experimenting with unique sourdough inclusions (like my dill pickle or s’mores loaves), but I always find myself coming back to the simpler, more rustic sourdough bread recipes.
Some of my favorites? Basic sourdough, multigrain, and now this maple oat sourdough bread.
This bread super versatile—perfect for sandwiches, avocado toast, or even breakfast casserole, croutons, or breadcrumbs. Honestly, I ate the whole loaf toasted with cottage cheese—so good!
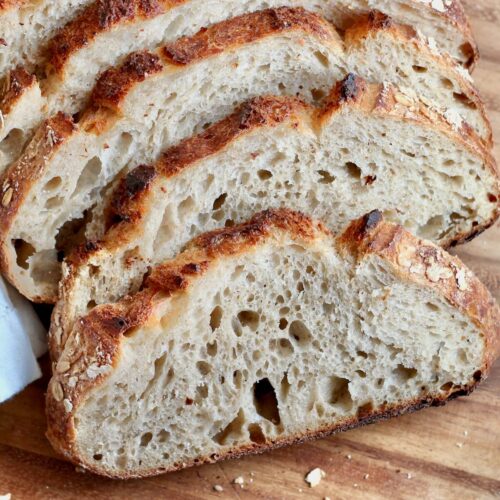
But the best part is how soaking the oats makes the bread extra soft, moist, and chewy. The nuttiness of the oats paired with the subtle sweetness of maple syrup creates a perfectly balanced flavor.
And for anyone new to sourdough inclusions, this maple oat loaf is a great place to start. The dough is easy, low-hydration, and just as satisfying to make as it is to eat.
I hope you try it and love it as much as I do!
Disclaimer: Some links throughout this post are affiliate links. As an Amazon Associate, I earn from qualifying purchases. You can learn more by visiting my Affiliate Disclosure Page.
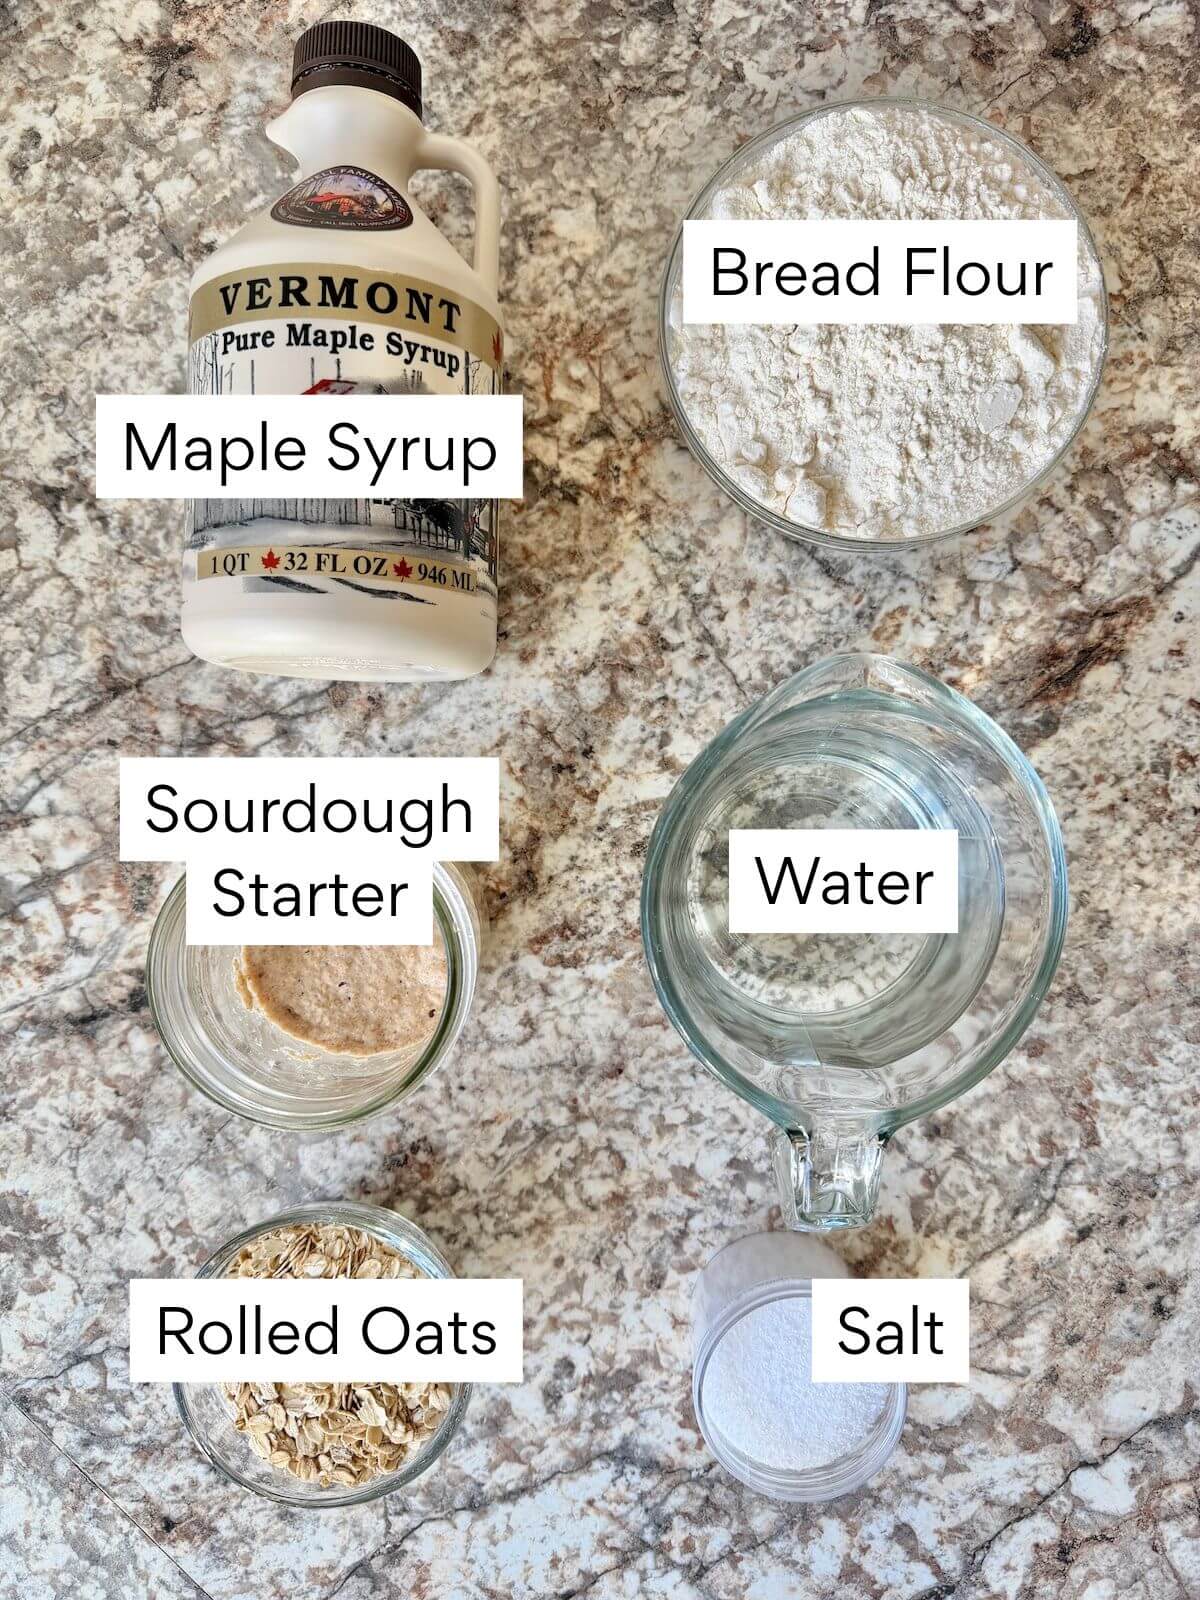
Ingredients & Substitutions
Here are some notes on key ingredients. For a full list of ingredients, check out the recipe card below.
- Active Sourdough Starter- Make sure your starter is bubbly and active before mixing. You can also use fresh sourdough discard (1–2 days old), but the dough may take longer to rise.
- Rolled Oats- Soak in very hot (not boiling) water until they soften.
- Maple Syrup- Adds natural sweetness and a subtle maple flavor. You can adjust the amount to taste, or substitute with honey if preferred.
- Maple Extract (optional) - Adds a stronger maple flavor without adding extra liquid or sugar.
- Bread Flour- Provides structure, chew, and a good rise. All-purpose flour works too, but the loaf may be slightly softer and flatter.
- Water- Use cool water to cool down the hot oats. Adjust slightly for your preferred dough hydration or depending on your kitchen’s humidity.
- Kosher Salt- Enhances flavor. I use Diamond Crystal Kosher Salt (2.8 grams per teaspoon). If using Morton’s or table salt, use about half the amount or weigh for accuracy.
Tips for Success
- Use an active starter. Make sure it’s bubbly and well-fed for a strong rise.
- Weigh your ingredients. A kitchen scale ensures accurate hydration and consistent results.
- Be patient during bulk fermentation. Wait until the dough is puffy and roughly doubled—this gives a light, open crumb.
- Build tension when shaping. A taut surface helps the bread hold its shape and rise beautifully.
- Don't skip the cold proof. Refrigerating overnight enhances flavor and makes scoring easier.
- Cool completely before slicing. Let the loaf rest 2–4 hours so the crumb sets and doesn't become gummy.
How to Make Maple Oat Sourdough Bread
Follow along with these easy steps and photos to make maple oat sourdough bread.
Step 1: Feed starter. Feed your starter 6–12 hours before baking so it’s bubbly and active.

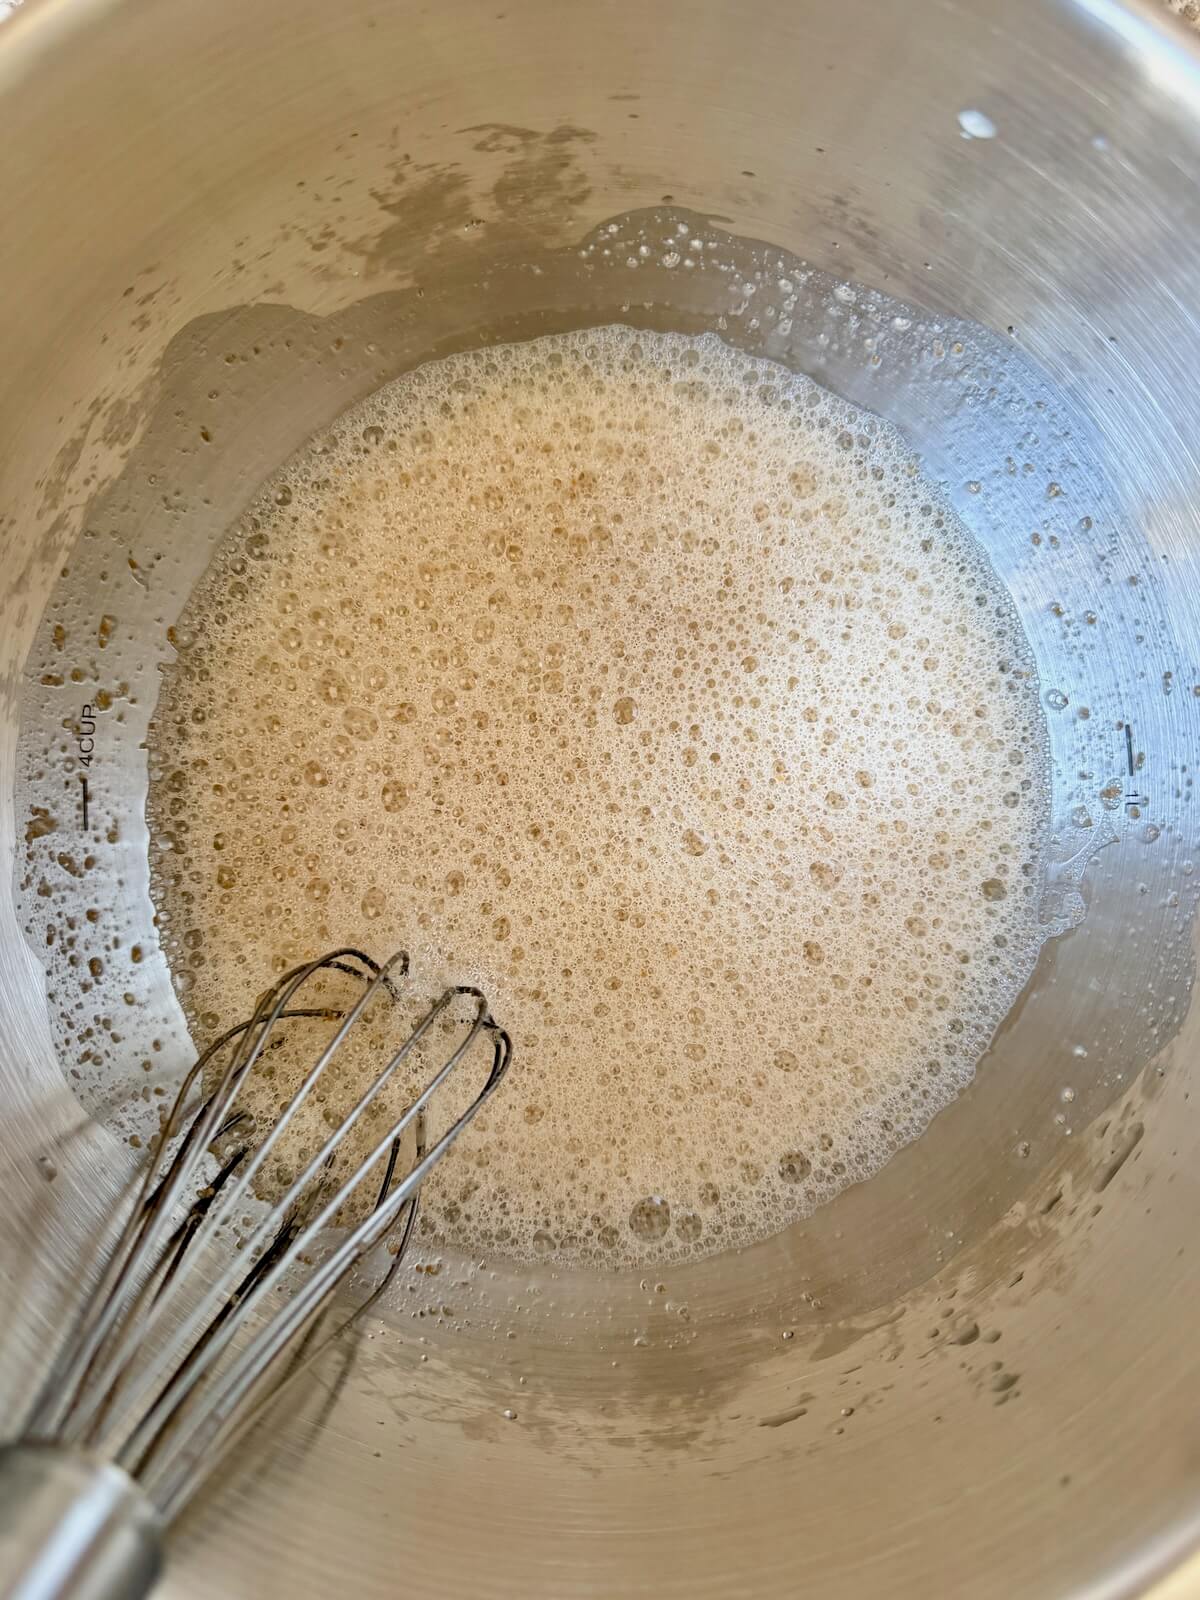
Step 2: Soak the oats. Combine rolled oats and hot water.

Step 3: Mix dough. Whisk water, oats, starter, maple syrup, and extract (if using). Add flour and salt, then mix until a rough, shaggy dough forms. Rest 20 minutes.


Step 4: Stretch and fold. Wet your hands, stretch one side over the dough, rotate, repeat all four sides. Rest 15 minutes. Repeat 3 more times (4 total).

Step 5: Bulk fermentation. Cover and let dough rise until puffy and doubled (4–12 hours).


Step 6: Shape. Turn dough onto a floured surface, stretch into a rectangle, fold long sides in, then short sides. Flip seam-side down and tighten into a ball.


Step 7: Cold proof. Dust basket with rice flour and optional oats. Place dough seam-side up. Cover and refrigerate 12–16 hours.


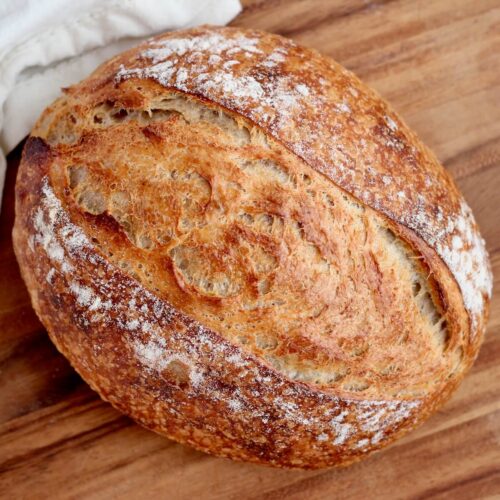
Step 8: Bake. Heat a lidded Dutch oven at 450°F for 30–60 minutes. Turn dough out seam-side down, score, add 2 ice cubes to the Dutch oven, and bake 40 minutes covered plus 5–10 minutes uncovered. Transfer to a rack and cool 2–4 hours before slicing.


Baker's Timeline
Use this sample timeline to help plan out your maple oat sourdough bread:
- 8:00 PM (Night Before): Feed your starter.
- 8:00–9:00 AM: Soak oats, mix the dough, & rest 20 minutes.
- 9:00–10:00 AM: Do stretch and folds.
- 10:00 AM–6:00 PM (varies): Bulk fermentation (until doubled in size).
- 6:00–6:30 PM: Shape the dough.
- 6:30 PM–6:30 AM (Next Day): Cold proof in the fridge overnight.
- 6:30–7:15 AM: Bake at 450°F.
- 7:15–9:15 AM: Cool completely before slicing.
Note: Rise times can vary depending on the strength of your starter and the temperature of your kitchen and dough. Use visual cues—like when your dough has doubled in size—rather than the clock.
How to Store
Keep your maple oat sourdough, whole or sliced, in a bread box or airtight container at room temperature for up to 3 days.
For longer storage, slice and freeze in a freezer-safe bag for up to 3 months. To enjoy, thaw at room temperature or warm slices in the toaster or oven.
Serving Suggestions
This maple oat sourdough bread is great for a hearty breakfast sandwich, grilled cheese, turkey sandwiches, or a BLT. It’s also delicious with cottage cheese (my personal favorite) or avocado toast.
If your loaf starts to get a little stale, use it for French toast, French toast casserole, egg strata, croutons, stuffing, or homemade breadcrumbs.


Are you tired of watching your sourdough discard go to waste?
It’s time to turn excess discard into something delicious with my new ebook - Everyday Sourdough!
Inside, you’ll find 27 tried-and-true sourdough discard recipes that will transform your leftover starter into mouthwatering creations your family and friends will love.
No more guilt about wasting your discard - with Everyday Sourdough, you have endless options to quickly make something amazing anytime.
Let's Connect!
Be sure to leave a comment below if you have any questions. You can also connect with me on Instagram, Facebook, Pinterest, or via email at [email protected].


📖 Recipe

Maple Oat Sourdough Bread
Equipment
- Straight-sided container (optional, for bulk fermentation)
- Proofing basket or bowl lined with tea towel
- Bread sling or parchment paper
- Lame or sharp knife
Ingredients
Soaked Oats
- 1 cup (80 grams) rolled oats
- ½ cup (120 grams) very hot water
Dough
- 1 to 1 ¼ cups (240 to 300 grams) cool water start with 240 grams and adjust up to preferred hydration
- ½ cup (100 grams) active sourdough starter
- ¼ cup (85 grams) maple syrup
- ½ teaspoon maple syrup extract optional, for stronger maple flavor
- 4 cups (480 grams) bread flour
- 4 teaspoons (11 grams) Diamond Crystal Kosher Salt use 2 teaspoons if using Morton's brand or table salt or weight in grams
- Rice flour for dusting proofing basket
- 2 ice cubes for steam
Instructions
- About 6–12 hours before mixing, feed your starter so it’s bubbly, active, and at its peak.
- In a small bowl, combine the rolled oats and very hot (not boiling) water. Stir until the oats soften and absorb all of the water.1 cup (80 grams) rolled oats, ½ cup (120 grams) very hot water
- In a large bowl, whisk together the cool water and oats. Whisk in the active starter, maple syrup, and maple extract (if using). Then, add the bread flour and salt, mixing thoroughly with your hands until a sticky, shaggy dough forms. Adjust hydration with more water, if desired. Cover and let rest 20 minutes.1 to 1 ¼ cups (240 to 300 grams) cool water, ½ cup (100 grams) active sourdough starter, ¼ cup (85 grams) maple syrup, ½ teaspoon maple syrup extract, 4 cups (480 grams) bread flour, 4 teaspoons (11 grams) Diamond Crystal Kosher Salt
- Lightly wet your hands. Grab one side of the dough, stretch it upward, and fold it over the center. Rotate the bowl 90° and repeat for all four sides. Cover and rest 15 minutes. Repeat 3 more times (4 sets total) with 15-minute rests in between.
- Cover the bowl and let the dough rise until puffy, bubbly, and roughly doubled in size—this can take 4–12 hours (or longer) depending on temperature and starter activity.
- Lightly flour your counter and turn the dough out. Gently stretch it into a loose rectangle. Fold the long sides toward the center like a letter, then fold the short sides the same way. Flip seam-side down and gently tighten into a round ball by cupping your hands and pulling the dough toward you.
- Dust a proofing basket with rice flour. If you want oats on the outside of the loaf, sprinkle extra rolled oats in the bottom of the basket. Place the dough in the basket seam-side up. Cover and refrigerate for 12–16 hours.Rice flour
- The next day, place a lidded Dutch oven inside your oven and preheat to 450°F. Once preheated, let it continue heating for another 30–60 minutes.
- Turn the dough out onto a sheet of parchment or a bread sling so it’s seam-side down. Score the top with a lame or sharp knife. Carefully place 2 ice cubes inside the Dutch oven for extra steam. Lower the dough into the pot, cover, and bake for 40 minutes. Remove the lid and bake for another 5–10 minutes until the crust reaches your desired color.2 ice cubes
- Transfer the bread to a wire rack and cool for at least 2–4 hours before slicing.
Notes
- Storage: Store in an airtight container or bread box at room temperature for up to 3 days or freeze sliced bread for up to 3 months.


Kitty says
I weighed all the ingredients, but the dough was much too wet. Was the 120 grams of hot water that you added to the oats supposed to be subtracted from the 300g of water in the recipe?
Ashley Petrie, RDN, LDN says
Hi Kitty! No, the 120 grams of water for the oats isn’t meant to be subtracted from the 300 grams of dough water. Did your oats fully absorb the 120 grams of water before you added them to the dough? And did you use rolled (old-fashioned) oats? If they weren’t fully soaked, that could make the dough feel much wetter than intended. Also, did you weigh the flour and water or use cups? Sometimes using cups vs grams can throw things off. This dough really shouldn’t be overly wet, so I'm not sure what happened.
Kitty says
Yes, I used rolled oats. And there was no leftover water when I added them to the dough. I weighed everything out in grams. The dough is in cold proofing now, but I really couldn’t shape the dough because it was so wet. I imagine I’m going to get a heavy loaf of something mapleish. Maybe it’ll work for French toast. Thanks
Ashley Petrie, RDN, LDN says
Hi Kitty! Thanks for responding. My only other thought is that it overfermented or got too warm and the gluten structure broke down. Could that be possible? I've had that happen to me before and the dough basically became liquid when trying to shape because there was no gluten to hold it together.