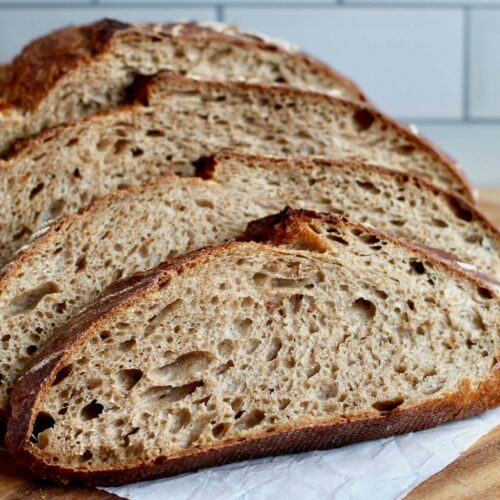
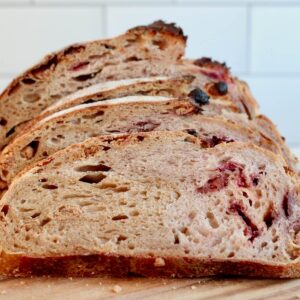
This Multigrain Sourdough Bread is made with whole wheat flour, along with a blend of whole grains and seeds, for a healthy, hearty loaf that’s perfect for sandwiches or toast.

If I could only keep one type of bread in my freezer, it would definitely be this multigrain sourdough bread.
As a dietitian, I tend to gravitate toward high-fiber, whole grain bread. And I find this one has the perfect mix of great flavor, a hearty texture, and wonderful health benefits.
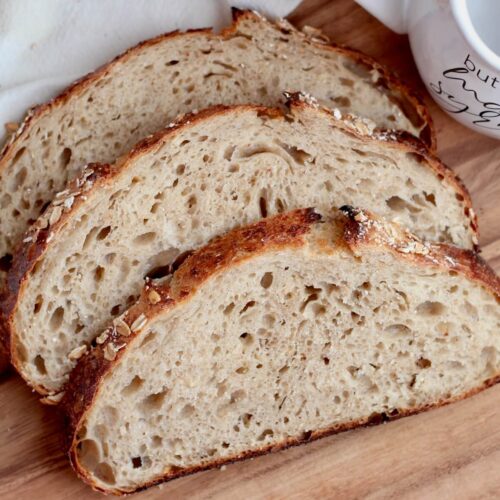
I first started making this recipe after visiting the King Arthur Baking popup in Boston, where I picked up a big bag of their Harvest Grain Blend. This blend is packed with oats, rye flakes, flaxseed, sunflower seeds, and more.
As soon as I got home, I couldn’t wait to start experimenting by adding it to different doughs.
The combination of half whole wheat flour, half bread flour, and the grain blend worked so well that I knew I had to share it on the blog. I love it so much, I’m already on my fourth or fifth loaf in just over a month.
I’ve been enjoying it toasted with avocado nearly every day. It’s also fantastic for sandwiches, charcuterie boards, and dipping.
I’m so excited to share my recipe for multigrain sourdough bread with you today. I hope you give it a try and enjoy it as much as I do!
Disclaimer: Some links throughout this post are affiliate links. As an Amazon Associate, I earn from qualifying purchases. You can learn more by visiting my Affiliate Disclosure Page.
Ingredients & Substitutions
Here are some notes on key ingredients. For a full list of ingredients, check out the recipe card below.
- Active Sourdough Starter- This multigrain sourdough loaf relies on a strong, bubbly, and active starter for a good rise. If you prefer to use discard, opt for some that’s only a few days old - just be aware that the dough may take longer to rise.
- Bread Flour- Using about half bread flour balances the hearty, denser whole wheat flour, resulting in a taller, more airy loaf.
- Whole Wheat Flour- Whole wheat flour gives this seeded sourdough bread a nutty flavor and hearty texture. Don't be afraid to play around with the ratio of bread flour to whole wheat flour to suit your tastes.
- Grain Blend- Feel free to use up to ½ cup of your favorite grain or seed blend in this recipe. I used King Arthur Baking's Harvest Grains Blend, which includes oats, millet, rye, wheat, flax, poppy, sesame, and sunflower seeds.
- Water- This recipe uses about 75% hydration, but the dough is still easy to handle because whole wheat flour absorbs more water. Feel free to adjust the hydration level to what works best for you.
- Kosher Salt- Enhances the flavor of the bread. I use Diamond Crystal Kosher Salt, which is about 8.4 grams per tablespoon. If you're using table salt or Morton's brand, be sure to measure by weight or use about half the amount.

Tips for Success
- Use active sourdough starter. For the best results, use an active sourdough starter. If you want to use discard, opt for some that is only a few days old and keep in mind that it may take longer for your dough to rise.
- Try higher hydration. Whole grains absorb more water, so aim for a hydration level of at least 70–75% to promote better gluten development.
- Don't skip autolyse. Be sure to mix the flour and water and let it sit for about one hour before adding the starter and salt. This hydrates the grains, softens the dough, and improves gluten development.
- Find a warm spot to rise. Let the dough rise in a warm (not hot) place, especially in cooler weather, to speed up fermentation.
- Watch the fermentation time. Whole wheat doughs may ferment more quickly due to their higher nutrient content. Monitor closely to avoid overproofing, which can result in a denser loaf.
- Build tension when shaping. When shaping, create surface tension on the dough without tearing it. This helps the loaf rise up rather than spread out in the oven.
- Cool completely. Wait at least two hours before slicing to avoid a gummy texture.
How to Make Multigrain Sourdough Bread
Here is how to make sourdough multigrain bread.
1. Feed Sourdough Starter
- Feed your sourdough starter 6-12 hours before starting to ensure it’s bubbly and active.
- Timing will depend on your kitchen temperature.
- In cooler kitchens (around 65-68℉), it might take 10-12 hours. In warmer kitchens (75℉), it might take just 6 hours.

2. Autolyse
- About one hour before your starter is ready, combine bread flour, whole wheat flour, grain blend, and water in a large mixing bowl.
- Mix until no dry flour remains.
- Cover the bowl and let it rest for 1 hour. This helps hydrate the grains and kickstart gluten development.

3. Mix the Dough
- Add your active sourdough starter and kosher salt to the bowl.
- Use your hands to mix for about 5 minutes until everything is fully combined.
- Cover the bowl and let the dough rest for 20 minutes.


4. Stretch and Fold
- Lightly wet your hands to prevent sticking.
- Perform a “stretch and fold”: Grab one edge of the dough, stretch it upwards without tearing it, and fold it over the top. Rotate the bowl 90° and repeat on all four sides.
- Gather the dough into a ball and flip it seam-side down in the bowl.
- Cover and let it rest for 20 minutes.
- Repeat this stretch-and-fold process a total of 4 times, with 20-minute rests between each round.

5. Bulk Fermentation
- Cover the dough and let it rise until it doubles in size and develops visible fermentation bubbles on the surface.
- The rise time can vary widely, taking anywhere from 4 to 8 hours or more, depending on the temperature of your kitchen and the strength of your starter.
- For an easy way to track its progress, use a straight-sided container and mark the starting level of the dough.


6. Pre-Shape
- Turn the fermented dough out onto a lightly floured surface.
- Gently pull it into a large rectangle.
- Fold one long edge toward the center, then the other, like folding a letter. Then, fold each short end towards the center in the same manner.
- Flip the dough seam-side down, gently shaping it into a ball.
- Cover and let it rest for 15 minutes.


7. Shape
- Flip the dough seam-side up again and gently stretch it into a smaller rectangle.
- If you're using a bowl or banneton, repeat the shaping process above.
- For a batard, fold the shorter edges of the rectangle toward the center. Then, starting at one of the longer edges, roll the dough tightly into a log, pinching the seam and ends to seal.
8. Cold Proof
- Dust your proofing basket generously with rice flour to prevent sticking.
- Transfer the shaped dough into the basket, seam side up. Pinch the seam to seal if necessary.
- Cover and cold proof the dough overnight in the refrigerator (about 12-16 hours).

9. Bake the Bread
- Place a lidded Dutch oven inside your oven and preheat to 450℉. Let the Dutch oven heat for an extra 30-60 minutes once the oven reaches temperature.
- Turn the dough out onto a bread sling or parchment paper. Score the top as desired with a lame or sharp knife.
- Carefully place 2 ice cubes in the Dutch oven for steam.
- Use the parchment or sling to transfer the dough into the hot Dutch oven. Cover immediately with the lid to trap the steam inside.
- Bake at 450℉ for 40 minutes with the lid on. Then, remove the lid and bake for an additional 5-10 minutes or until your desired crust color is achieved.
- Allow the bread cool on a wire rack for at least 2-4 hours before slicing and serving.


Baker's Timeline
Here is an example of a schedule you can use to make this seeded sourdough bread.
- 8:00 PM (Night Before): Feed your starter.
- 7:00-8:00 AM: Autolyse.
- 8:00 AM: Mix the dough.
- 8:30-9:30 AM: Stretch and fold.
- 9:30 AM-3:30 PM: Bulk fermentation.
- 3:30-4:00 PM: Shape.
- 4:00 PM-8:00 AM (Next Day): Cold proof.
- 8:00-8:45 AM: Bake.
- 8:45 AM-12:45 PM: Cool.
Note: Rise times will vary depending on the strength of your starter and the temperature of your kitchen and dough. It's best to use visual cues from your starter and dough rather than sticking to a strict timeline.
How to Store
- Uncut Loaf- Keep the unsliced multigrain sourdough bread at room temperature in a bread box or on the counter for up to 3 days.
- Sliced Bread- Store slices in an airtight container at room temperature for up to 2 days.
- Freeze- For longer storage, freeze the sliced bread in a freezer-safe container for up to 3 months. When ready to enjoy, thaw at room temperature or warm briefly in the microwave.


Are you tired of watching your sourdough discard go to waste?
It’s time to turn excess discard into something delicious with my new ebook - Everyday Sourdough!
Inside, you’ll find 27 tried-and-true sourdough discard recipes that will transform your leftover starter into mouthwatering creations your family and friends will love.
No more guilt about wasting your discard - with Everyday Sourdough, you have endless options to quickly make something amazing anytime.
Let's Connect!
Be sure to leave a comment below if you have any questions. You can also connect with me on Instagram, Facebook, Pinterest, or via email at [email protected].


📖 Recipe

Multigrain Sourdough Bread
Equipment
- Proofing basket banneton or batard
- Lame or sharp knife
- Bread sling or parchment paper
Ingredients
- 2 ¼ cups (270 grams) bread flour
- 2 cups (240 grams) whole wheat flour
- ½ cup (80 grams) grain blend choose your favorite mix; King Arthur Baking's Harvest Grains Blend is a great option
- 1 ½ cups + 2 tablespoons (390 grams) water
- ½ cup (100 grams) active sourdough starter
- 4 teaspoons (11 grams) Diamond Crystal Kosher Salt use about half the volume if substituting with Morton's kosher salt or table salt
- Rice flour for dusting proofing basket
- 2 ice cubes for steam
Instructions
- Feed your sourdough starter 6-12 hours before starting to ensure it’s bubbly and active. Timing will depend on your kitchen temperature. In cooler kitchens (around 65-68℉), it might take 10-12 hours. In warmer kitchens (75℉), it might take just 6 hours.
- About one hour before your starter is ready, combine bread flour, whole wheat flour, grain blend, and water in a large mixing bowl. Mix until no dry flour remains. Cover the bowl and let it rest for 1 hour. This helps hydrate the grains and kickstart gluten development.2 ¼ cups (270 grams) bread flour, 2 cups (240 grams) whole wheat flour, ½ cup (80 grams) grain blend, 1 ½ cups + 2 tablespoons (390 grams) water
- Add your active sourdough starter and kosher salt to the bowl. Use your hands to mix for about 5 minutes until everything is fully combined. Cover the bowl and let the dough rest for 20 minutes.½ cup (100 grams) active sourdough starter, 4 teaspoons (11 grams) Diamond Crystal Kosher Salt
- Lightly wet your hands to prevent sticking. Perform a “stretch and fold”: grab one edge of the dough, stretch it upwards without tearing it, and fold it over the top. Rotate the bowl 90° and repeat on all four sides. Gather the dough into a ball and flip it seam-side down in the bowl. Cover and let it rest for 20 minutes. Repeat this stretch-and-fold process a total of 4 times, with 20-minute rests between each round.
- Cover the dough and let it rise until it doubles in size and develops visible fermentation bubbles on the surface. The rise time can vary widely, taking anywhere from 4 to 8 hours or more, depending on the temperature of your kitchen and the strength of your starter. For an easy way to track its progress, use a straight-sided container and mark the starting level of the dough.
- Turn the fermented dough out onto a lightly floured surface. Gently pull it into a large rectangle. Fold one long edge toward the center, then the other, like folding a letter. Then, fold each short end towards the center in the same manner. Flip the dough seam-side down, gently shaping it into a ball. Cover and let it rest for 15 minutes.
- Flip the dough seam-side up and gently stretch it into a smaller rectangle. If you're using a bowl or banneton, repeat the shaping process above. For a batard, fold the shorter edges of the rectangle toward the center. Then, starting at one of the longer edges, roll the dough tightly into a log, pinching the seam and ends to seal.
- Dust your proofing basket generously with rice flour to prevent sticking. Transfer the shaped dough into the basket, seam side up. Pinch the seam to seal if necessary. Cover and cold proof the dough overnight in the refrigerator (about 12-16 hours).Rice flour
- Place a lidded Dutch oven inside your oven and preheat to 450℉. Let the Dutch oven heat for an extra 30-60 minutes once the oven reaches temperature.
- Turn the dough out onto a bread sling or parchment paper. Score the top as desired with a lame or sharp knife. Carefully place 2 ice cubes in the Dutch oven for steam. Use the parchment or sling to transfer the dough into the hot Dutch oven. Cover immediately with the lid to trap the steam inside.2 ice cubes
- Bake at 450℉ for 40 minutes with the lid on. Then, remove the lid and bake for an additional 5-10 minutes or until your desired crust color is achieved.
- Allow the bread cool on a wire rack for at least 2-4 hours before slicing and serving.
Notes
- For the best results, use a kitchen scale to measure your ingredients.
- Storage: Store the uncut loaf at room temperature for up to 3 days, or freeze it for up to 3 months. Sliced sourdough can be kept in an airtight container at room temperature for up to 2 days, or frozen for up to 3 months. Avoid refrigerating sourdough bread, as it can dry out the loaf.

Nicole Allen says
Your bread recipes are great. I have tried several and all are a delicious success. I really appreciate that you add the measurements in the recipes so that I don't have to go back to the ingredient list. Highly recommend!!!!!
Ashley Petrie, RDN, LDN says
Hi Nicole! Thank you so much! I’m so glad the recipes have been a hit for you, and I’m happy the measurements make things easier to follow. I really appreciate you taking the time to share! 🙂