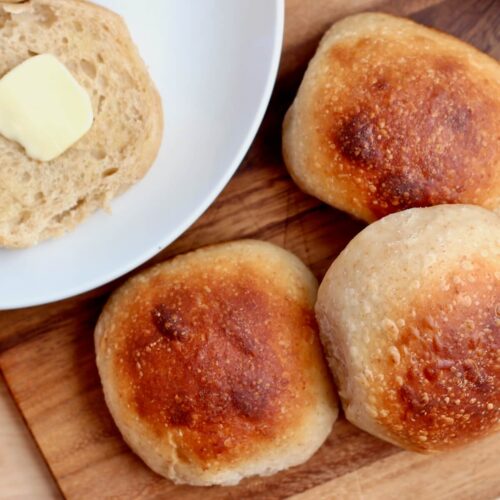
These Sourdough Hoagie Rolls are so soft, fluffy, and perfect for sandwiches. Made with only 6 ingredients, this no-knead sourdough recipe is a healthier, homemade alternative to store-bought rolls. Plus, this same recipe can be used to make sourdough sandwich rolls and sourdough hamburger buns too!

Hoagies, also known as subs or heroes, are a type of sandwich made with a long, narrow roll that has a crispy crust and a soft, chewy interior. Sourdough hoagie rolls take this classic sandwich to the next level with their tangy flavor and light, fluffy texture.
These soft sourdough sandwich rolls are made with only six simple ingredients and require no kneading, making them a great option for beginner bakers. And not only are they delicious, but they're also better for you than store-bought rolls, as they contain no preservatives or additives.
Plus, you can use this same recipe to make sourdough sandwich rolls and hamburger buns. In my efforts to replace all of our store-bought bread products with a homemade version, this versatile recipe has come in quite handy!
So why settle for bland, store-bought rolls when you can enjoy the deliciousness of these homemade sourdough hoagie rolls? Keep reading to learn everything you need to know to try them yourself.
Disclaimer: Some links throughout this post are affiliate links. As an Amazon Associate, I earn from qualifying purchases. You can learn more by visiting my Affiliate Disclosure Page.
Why You'll Love This Recipe
- Soft & Fluffy- The butter and honey create the softest, fluffiest sourdough buns. Perfect for sandwiches!
- Versatile- I've used this exact recipe to make sourdough dinner rolls, hoagie rolls, sandwich rolls, and hamburger buns.
- No-Knead- A technique called "stretch and folds" is used in place of kneading to build gluten in these sandwich buns.
- Only 6 Ingredients- With just a few ingredients, you'll have homemade sandwich rolls for yourself and your family to enjoy.
- No Artificial Ingredients- Making bread at home means you control the ingredients.
- Healthy- Sourdough hoagie rolls are fermented, thanks to the yeast and bacteria in your sourdough starter. Fermented bread products are thought to be easier to digest and more nutritious than their store-bought counterparts.
Ingredient Notes
Here are some notes on key ingredients. For a full list of ingredients, check out the recipe card below.
- Active Sourdough Starter- Make sure your sourdough starter is very bubbly and at peak activity for these hoagie rolls.
- Bread Flour- The extra protein in bread flour creates chewy rolls that rise beautifully in the oven.
- Water- This dough is approximately 67% water. However, the final hydration of the dough is slightly higher because it is affected by the water content of the starter and butter.
- Honey- Just a touch of honey adds a little sweetness and balances the flavor of these sandwich rolls.
- Butter- Fat adds flavor and creates soft rolls that are perfect for sandwiches.
- Kosher Salt- Enhances flavor.
Step by Step Instructions
Here is how to make these sourdough hoagie rolls.
Step 1: Feed Sourdough Starter
Feed your sourdough starter approximately 6-12 hours prior to using it in this recipe. You want your starter to be very bubbly and active before adding it to the dough.
My starter takes about 6 hours to become active and bubbly when it's stored between 70-75°F (21-24°C). This will vary depending on where you store your starter.
Step 2: Autolyse
About 30 minutes before your starter is ready, mix together the flour and water in a large mixing bowl until all of the flour is moistened and no dry spots remain. Let the mixture sit for 30 minutes so the flour can fully hydrate.
Step 3: Mix the Dough
Add your active sourdough starter, softened butter, honey, and kosher salt to the flour and water mixture. Use your hands or a stand mixer to thoroughly mix all of the ingredients together. It takes me about 5 minutes to fully mix the dough by hand. The dough starts out stringy and chunky, but then becomes cohesive as the butter is worked in. Let the dough rest for 20 minutes after mixing.
Step 4: Stretch and Fold
Perform the first set of stretch and folds. Do this by dipping your hand into a bowl of cold water before grabbing one edge of the dough and pulling it up as far as it will stretch before folding it over onto itself. Rotate the bowl 90 degrees and repeat. Repeat this stretching and folding around the dough two more times (for a total of 4 times). Cover and allow the dough to rest for 15 minutes before performing another set of stretch and folds. Perform 4-5 sets of stretch and folds total, letting the dough rest for 15 minutes in between each set. The dough should pass the windowpane test.*
Step 5: Bulk Fermentation
Cover the dough and allow it to rise in a warm environment (70-75°F, 21-24°C) for about 4-5 hours. Your dough is ready when it doubles in size, has visible bubbles forming on the surface, and jiggles slightly when the bowl is shaken.
Step 6: Shape
Carefully turn the dough out onto a lightly floured surface, taking care not to deflate any of the air built up inside it. Using a bench scraper, gently divide the dough into 6 equal-sized pieces. Pull each piece of dough into a rectangle with one of the long edges facing you. Then, shape the dough by rolling it up into a log shape, using your hands to lightly roll it back and forth to even out the thickness. Pinch to seal and place seam side down on a parchment-lined baking sheet.
Step 7: Proof
Cover the rolls and allow them to proof for 1-2 hours at room temperature. They should expand and get noticeably puffy. About 20 minutes before the rolls are done proofing, preheat the oven to 375°F.
Step 8: Egg Wash and Bake
In a small mixing bowl, whisk together an egg with one tablespoon of water. Brush the top and sides of each roll with the egg wash. Bake the rolls for 25 minutes or until puffy and the tops are golden brown. Transfer to a cooling rack and allow the rolls to cool completely before slicing.
Tips for Success
- Find the warmest spot in your kitchen. To keep your sourdough at the temperature it likes, choose the warmest spot in your kitchen. Some options for warm places include next to the stovetop, on top of the refrigerator, or inside the oven with the light turned on. Just avoid placing it in direct sunlight.
- Make sure your sourdough starter is active. For light and fluffy sourdough rolls, having a vigorous sourdough starter is key. It's important to make sure that your starter is active and bubbly prior to adding it to your dough.
- Weigh your ingredients. Measure your ingredients by weight rather than by volume for better, more consistent results.
- Keep water nearby. Sourdough is a wet, sticky dough. Dipping your hands in water is a helpful technique to avoid the dough sticking to your hands, making it easier to handle.
- Watch the dough, not the clock. When it comes to making sourdough bread, it's less about following a recipe and more about going with the flow. Keep an eye out for clues that your dough is ready, like its appearance or texture, rather than just watching the clock.
The Windowpane Test: To check if your dough has developed enough gluten after finishing your stretch and folds, use the windowpane test. Do this by stretching a small piece of the dough as thin as you can. You should be able to stretch it thin enough that you can see your fingers through it.
Substitutions and Variations
Here are a few ways you can try customizing this sourdough hoagie roll recipe to fit your diet and taste preferences.
Substitutions
- Bread Flour- Substitute bread flour for all-purpose flour, keeping in mind that the dough may be harder to work with and the rolls may not rise as well. Alternatively, replace up to 50 grams of bread flour with whole wheat flour for a bit more flavor.
- Butter- Swap butter for oil or dairy-free butter, if preferred. You can also leave the butter out entirely for a slightly crunchier roll.
- Honey- Use maple syrup, granulated sugar, or brown sugar in place of honey.
- Kosher Salt- Replace kosher salt with sea salt, pink Himalayan salt, or table salt.
Variations
- Dairy-Free- Swap butter for olive oil or dairy-free butter or leave the fat out entirely.
- Vegan- Replace or leave out the butter and use a mixture of non-dairy milk with a bit of olive oil in place of the egg wash. Additionally, swap the honey for maple syrup, brown sugar, or granulated sugar.
- Cheesy- Mix some grated parmesan or cheddar cheese directly into the dough during the stretch and fold step. Alternatively, sprinkle a little cheese on top of the hoagie bread before baking.
- Herbs- Add a few tablespoons of your favorite fresh or dried herbs. Try thyme, rosemary, and oregano.
- Seeds- Sprinkle your favorite seeds on top of these sandwich rolls before baking. Try everything bagel seasoning, poppy seeds, or sesame seeds (this recipe makes great hamburger buns!)
What to Serve With Sourdough Hoagie Rolls
Of course, sourdough hoagie rolls are made for sandwiches. From a classic Italian sub to a simple turkey and cheese, these sourdough rolls will make any sandwich feel extra special.
Here are a few of my favorite sandwiches, subs, and other ways to serve these sourdough hoagie rolls:
- Breakfast Sandwiches- I make breakfast sandwiches with these sourdough buns almost every morning. Try them with this Turkey and Egg Sandwich.
- Cold Cut Sandwiches- Italian meats, turkey and cheese, or roast beef all taste better on these sourdough hoagie rolls.
- Hot Subs- What could be better than a toasted meatball sub or French dip sandwich on a sandwich roll you make from scratch?
- Hamburgers- Use this same recipe to make hamburger buns. Just shape them into round balls instead of logs and top them with sesame seeds. I love using these sourdough buns for Air Fryer Turkey Burgers.
- Soup- Dip these sandwich rolls in your favorite soup. My favorite soup is this Homestyle Chicken Noodle Soup.
- Salads- Pair with a leafy green salad, like this Kale Crunch Salad, for a light and satisfying lunch.
- Charcuterie Boards- Cut these sourdough rolls into bite-sized pieces and use them as part of a charcuterie board spread.
How to Use Leftover Sourdough Hoagie Rolls
Sourdough sub rolls are hearty, versatile, and relatively plain, which means they can be repurposed in a variety of different ways.
Here are a few ideas for using up stale sourdough sandwich buns:
- Breadcrumbs
- Croutons
- Stuffing
- Bruschetta
- Bread Pudding
- French Toast or French Toast Casserole
- Grilled Cheese
- Breakfast Sandwiches
Storage and Reheating
How to Store
- Room Temperature- Store leftover sourdough hoagie rolls in an airtight container or plastic bag for 2-3 days at room temperature.
- Freezer- For longer storage, I recommend freezing sourdough sandwich rolls. To freeze, wrap individual rolls tightly in plastic wrap or aluminum foil and store them inside a freezer-safe plastic bag or container for up to 3 months.
Quick Tip: Do not store sourdough hoagie rolls in the refrigerator. The cold, dry air of the refrigerator quickly turns bread stale. For best results, store leftover sourdough hoagie rolls in the freezer.
How to Reheat
If your sandwich rolls are frozen, thaw at room temperature for a couple of hours before reheating. Alternatively, cover with a damp paper towel and thaw in the microwave for 30 seconds.
- Oven/Toaster Oven- Preheat oven to 350°F. Wrap the rolls in aluminum foil and place them on a baking sheet. Heat them in the oven for 10-15 minutes, or until they are warmed through.
- Toaster- Slice the rolls in half and place them in a toaster. Toast them on a low setting for 1-2 minutes, or until they are warmed through.
- Stovetop- Heat a small amount of butter or oil in a skillet over medium-low heat. Cut the rolls in half and place them cut-side down in the skillet. Heat for 3-5 minutes or until the bread is warmed through and toasted to your desired doneness.
- Microwave- Wrap your rolls in a damp paper towel and place them on a microwave-safe plate. Heat them in the microwave on high for 15-20 seconds, or until they are warmed through. Be careful not to overheat them, as this can make the bread tough.
- Air Fryer- Preheat the air fryer to 350°F. Place the rolls in the air fryer basket and heat for 2-3 minutes or until fully warmed through.
Make Ahead
Making these sourdough hoagie rolls ahead couldn't be easier. Plus, it's a great way to save time and ensure that you have fresh homemade bread for your sandwiches whenever you need it.
You have a couple of options when it comes to making this sourdough sandwich rolls recipe in advance:
- Freeze the cooked rolls. After the rolls have completely cooled, wrap them tightly in plastic wrap or aluminum foil and place them inside a freezer-safe plastic bag. They can be stored in the freezer for up to 3 months. Don't forget to label and date the bag!
- Refrigerate the dough. If you want to bake the rolls fresh, but don't have time for the whole process, you can make the dough in advance and refrigerate it for up to 2 days. Simply follow the recipe through the shaping step. Then, transfer the shaped rolls to a sheet of parchment paper, cover, and refrigerate. When ready to bake, allow the rolls to come to room temperature and become noticeably puffy before baking.
Frequently Asked Questions
Sourdough bread is a wonderful option for sandwiches, especially this sourdough hoagie rolls recipe. These rolls are soft, fluffy, and so much more flavorful than store-bought rolls.
Hoagies are typically made with "hoagie rolls," which are long, soft, and fluffy white bread rolls with a slightly crunchy exterior. Sub rolls, hero rolls, and baguettes are suitable substitutes for hoagie rolls.
Sourdough recipes, such as these sourdough sandwich rolls, use sourdough starter as the primary leavening ingredient. To make sandwich rolls without a sourdough starter, you'll need to use a recipe that calls for dry active yeast, instant yeast, or another leavening agent.
While there doesn't seem to be a significant difference between a sub roll and a hoagie roll, there are some subtleties that make each unique. Sub rolls tend to be softer than hoagie rolls, which have a slightly crunchy exterior.
Sourdough sandwich rolls are healthier than most store-bought sandwich rolls in a couple of ways. First, the rolls are fermented, which makes them easier to digest. Second, homemade sandwich rolls are free from preservatives and other added ingredients.
Let's Connect!
Be sure to leave a comment below if you have any questions about the recipe. You can also connect with me on Instagram, Facebook, Pinterest, or via email at [email protected].
More Sourdough Recipes
📖 Recipe
Sourdough Hoagie Rolls
Ingredients
- 4 ½ cups (540 grams) bread flour
- 1 ½ cups (360 grams) warm water 80-90°F
- ½ cup (113 grams) active sourdough starter
- 3 tablespoons (42 grams) unsalted butter softened to room temperature
- 2 ¼ tablespoons (45 grams) honey
- 2 ½ teaspoons (12 grams) kosher salt
- 1 large egg
- 1 tablespoon water for egg wash
Instructions
- Quick Note: Keep in mind that sourdough recipes are more of a guideline than a step-by-step process to follow. Temperature, humidity, and the strength of your starter all play a role in how long it will take your dough to rise. It's more important to pay attention to how your starter and dough look rather than the amount of time that has passed. Please see the blog post above for helpful images associated with each step.
- Feed Starter: Feed your sourdough starter approximately 6-12 hours prior to using it in this recipe. You want your starter to be very bubbly and active before adding it to the dough.*My starter takes about 6 hours to become active and bubbly when it's stored between 70-75°F (21-24°C). This will vary depending on your particular starter and where you store it.
- Autolyse: About 30 minutes before your starter is ready, mix together the flour and water in a large mixing bowl until all of the flour is moistened and no dry spots remain. Let the mixture sit for 30 minutes so the flour can fully hydrate.4 ½ cups (540 grams) bread flour, 1 ½ cups (360 grams) warm water
- Mix Dough: Add your active sourdough starter, softened butter, honey, and kosher salt to the flour and water mixture. Use your hands or a stand mixer to thoroughly mix all of the ingredients together. It takes me about 5 minutes to fully mix the dough by hand. The dough starts out stringy and chunky, but then becomes cohesive as the butter is worked in. Let the dough rest for 20 minutes after mixing.½ cup (113 grams) active sourdough starter, 3 tablespoons (42 grams) unsalted butter, 2 ¼ tablespoons (45 grams) honey, 2 ½ teaspoons (12 grams) kosher salt
- Stretch and Fold: Perform the first set of stretch and folds. Do this by dipping your hand into a bowl of cold water before grabbing one edge of the dough and pulling it up as far as it will stretch before folding it over onto itself. Rotate the bowl 90 degrees and repeat. Repeat this stretching and folding around the dough two more times (for a total of 4 times). Cover and allow the dough to rest for 15 minutes before performing another set of stretch and folds. Perform 4-5 sets of stretch and folds total, letting the dough rest for 15 minutes in between each set. The dough should pass the windowpane test.*
- Bulk Fermentation: Cover the dough and allow it to rise in a warm environment (70-75°F, 21-24°C) for about 4-5 hours. Your dough is ready when it doubles in size, has visible bubbles forming on the surface, and jiggles slightly when the bowl is shaken.
- Shape: Carefully turn the dough out onto a lightly floured surface, taking care not to deflate any of the air built up inside it. Using a bench scraper, gently divide the dough into 6 equal-sized pieces. Pull each piece of dough into a rectangle with one of the long edges facing you. Then, shape the dough by rolling it up into a log shape, using your hands to lightly roll it back and forth to even out the thickness. Pinch to seal and place seam side down on a parchment-lined baking sheet.
- Proof: Cover the rolls and allow them to proof for 1-2 hours at room temperature. They should expand and get noticeably puffy. About 20 minutes before the rolls are done proofing, preheat the oven to 375°F.
- Egg Wash and Bake: In a small mixing bowl, whisk together an egg with one tablespoon of water. Brush the top and sides of each roll with the egg wash. Bake the rolls for 25 minutes or until puffy and the tops are golden brown. Transfer to a cooling rack and allow the rolls to cool completely before slicing.1 large egg, 1 tablespoon water
Notes
- *The Windowpane Test: To check if your dough has developed enough gluten after finishing your stretch and folds, use the windowpane test. Do this by stretching a small piece of the dough as thin as you can. You should be able to stretch it thin enough that you can see your fingers through it.
- Quick Tip: This dough is pretty wet and sticky. Dipping your hands in water is a helpful technique to avoid the dough sticking to your hands, making it easier to handle. Also, use a bench scraper to help you maneuver the dough as you're shaping.
- Storage: Store rolls in an airtight container or plastic bag at room temperature for up to 3 days or freeze for up to 3 months.
- Make Ahead: The dough can be refrigerated for up to 2 days after shaping. Then, allow the rolls to puff up and come to room temperature before baking.
Comments
No Comments