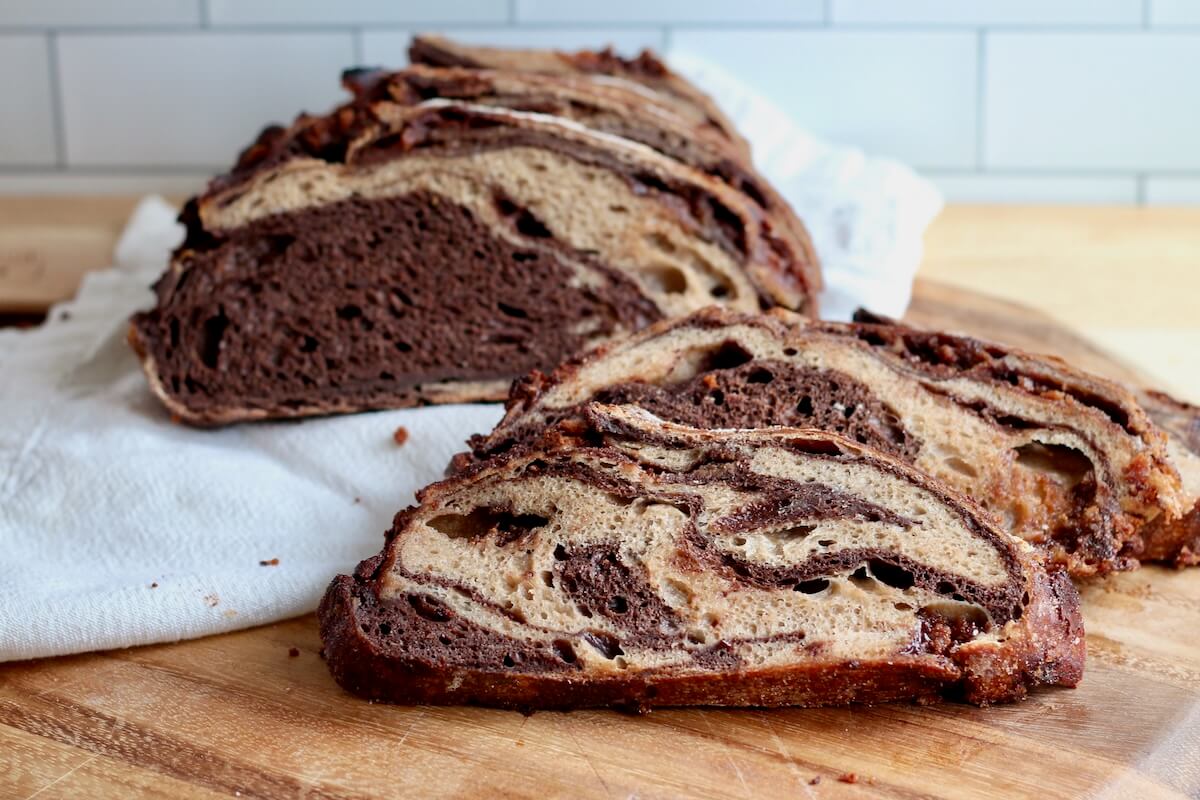
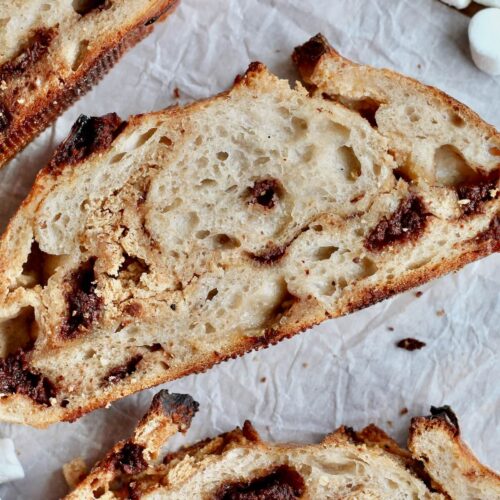
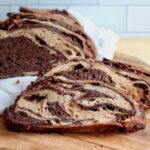
This Chocolate Peanut Butter Sourdough Bread combines cocoa powder and peanut butter powder into a marbled swirl dough before folding in peanut butter cups for a sweet, dessert-style inclusion loaf.
I’ve been having so much fun lately getting creative with sourdough and turning some of my favorite foods into bread.
After sharing a few savory loaves recently, like tomato soup, French onion soup, and loaded baked potato sourdough, I wanted to switch things up with something sweet. Peanut butter cups immediately came to mind.
I knew I wanted a swirled chocolate dough with peanut butter cups folded in. My first test, the peanut butter cups broke down more than I wanted. So I made another loaf and decided to freeze the peanut butter cups before mixing them in. That did the trick.
I shared most of the final loaf with my dad, and he told me it was gone in three days. Clearly a winner!
This chocolate peanut butter sourdough bread gets its sweetness entirely from the peanut butter cups. There’s no added sugar in the dough. It’s rich, chocolatey, and perfect when you’re craving a dessert-style sourdough or want a fun bake to make with kids.
I hope you love it as much as I do!
Disclaimer: Some links throughout this post are affiliate links. As an Amazon Associate, I earn from qualifying purchases. You can learn more by visiting my Affiliate Disclosure Page.
Ingredients & Substitutions
Here are some notes on key ingredients. For a full list of ingredients, check out the recipe card below.
- Active Sourdough Starter- Use a bubbly, recently fed starter for the best rise. You can also use 1–2 day old discard, but fermentation may take a little longer.
- Cocoa Powder- Both natural and Dutch-processed cocoa powder work well in this recipe.
- Peanut Butter Powder- I used PB2, but any peanut butter powder should work.
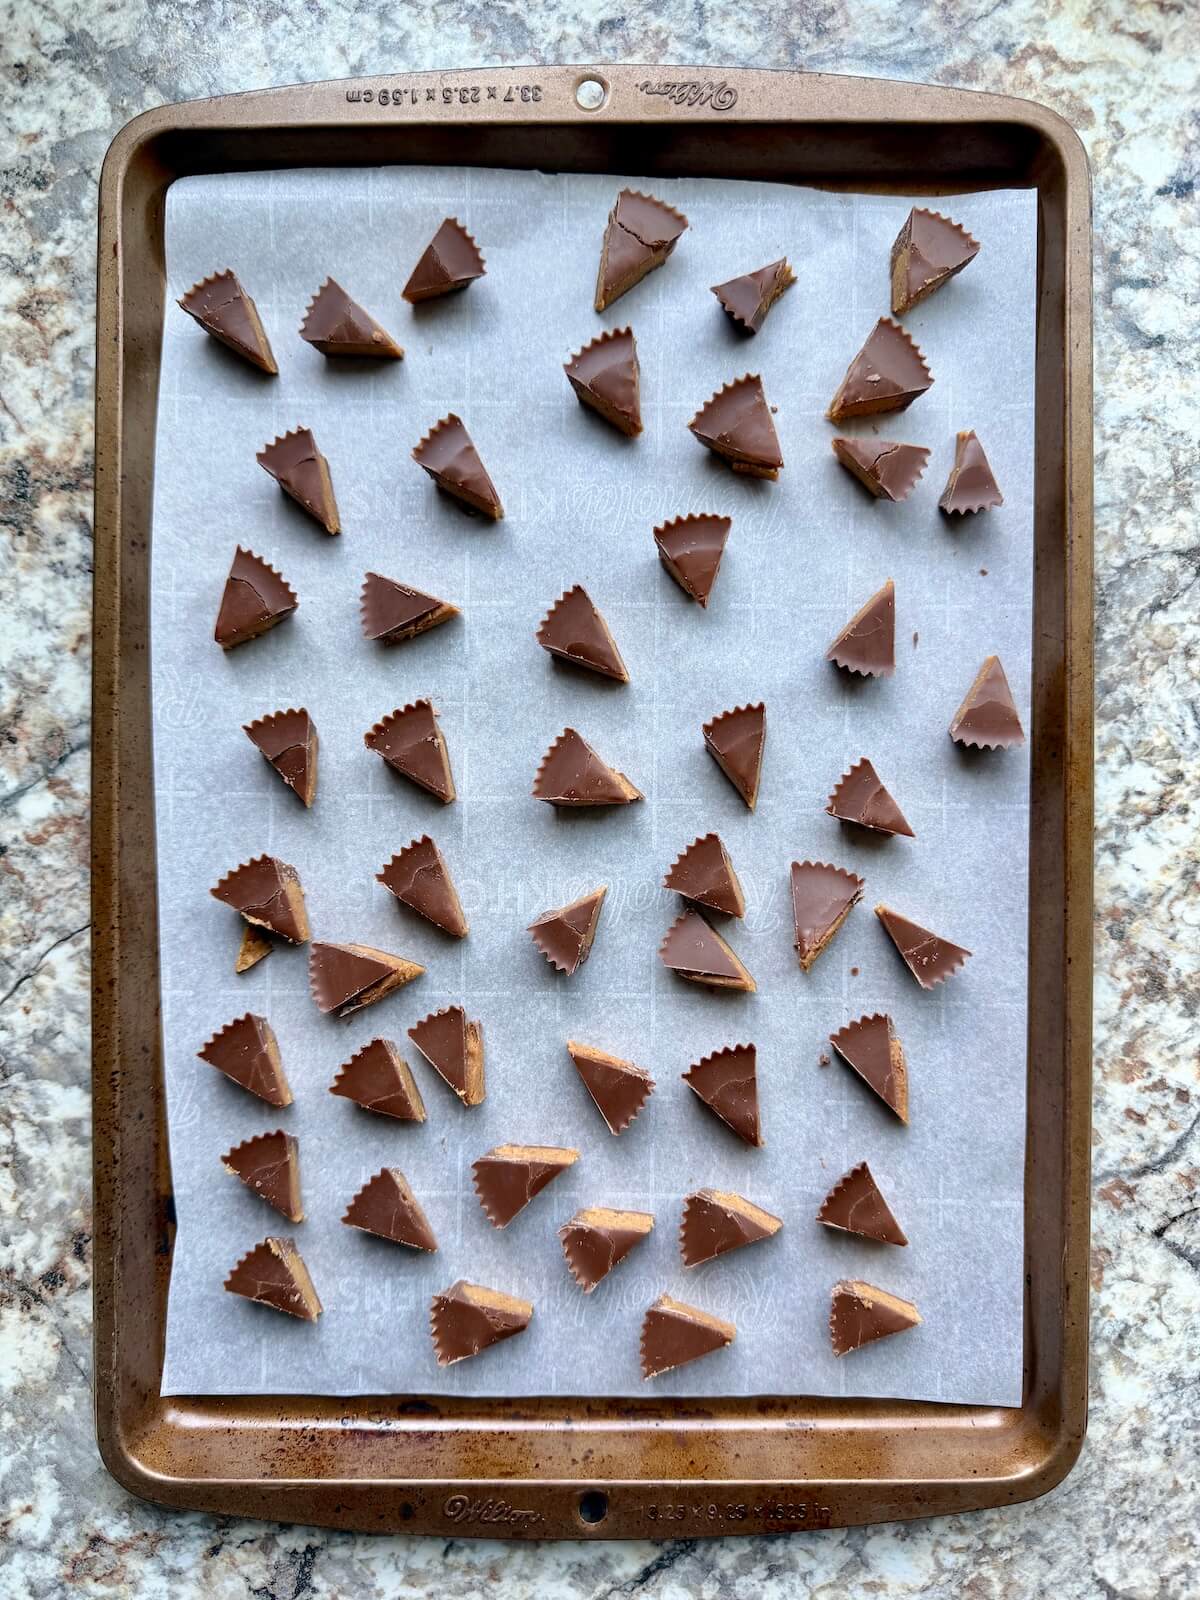
- Peanut Butter Cups- Cut into small pieces and freeze before using. This helps them hold their shape during shaping and baking.
- Bread Flour- Provides structure, chew, and height. All-purpose flour can be used but loaf may be slightly flatter and more dense.
- Water- Adjust as needed to achieve the dough consistency you're most comfortable with.
- Kosher Salt- Enhances flavor and strengthens the dough. I use Diamond Crystal Kosher Salt (2.8 grams per teaspoon). If using Morton’s or table salt, use about half as much by volume or weigh for accuracy.

Tips for Success
- Weigh your ingredients. A kitchen scale provides the most accurate measurements and consistent results.
- Freeze peanut butter cups. This helps them hold their shape during shaping and prevents them from melting into the dough.
- Use an active starter. A bubbly, recently fed starter will give the best rise. Discard can be used, but fermentation may take longer.
- Adjust the dough if needed. Cocoa and peanut butter powder can absorb moisture differently. If the dough feels too stiff, add a small splash of water.
- Watch the dough, not the clock. Bulk fermentation is done when the dough is puffy, airy, and roughly doubled in size.
- Cool before slicing. Let the bread cool for at least 2 hours so the crumb can fully set.
How to Make Chocolate Peanut Butter Sourdough Bread
Follow these step-by-step photos to make your own chocolate peanut butter cup swirl sourdough bread. Full details are in the recipe card below.
Step 1: Feed starter. Feed your sourdough starter 6–12 hours before baking so it's bubbly and active.
Step 2: Freeze peanut butter cups. Cut the peanut butter cups into pieces and freeze until solid.
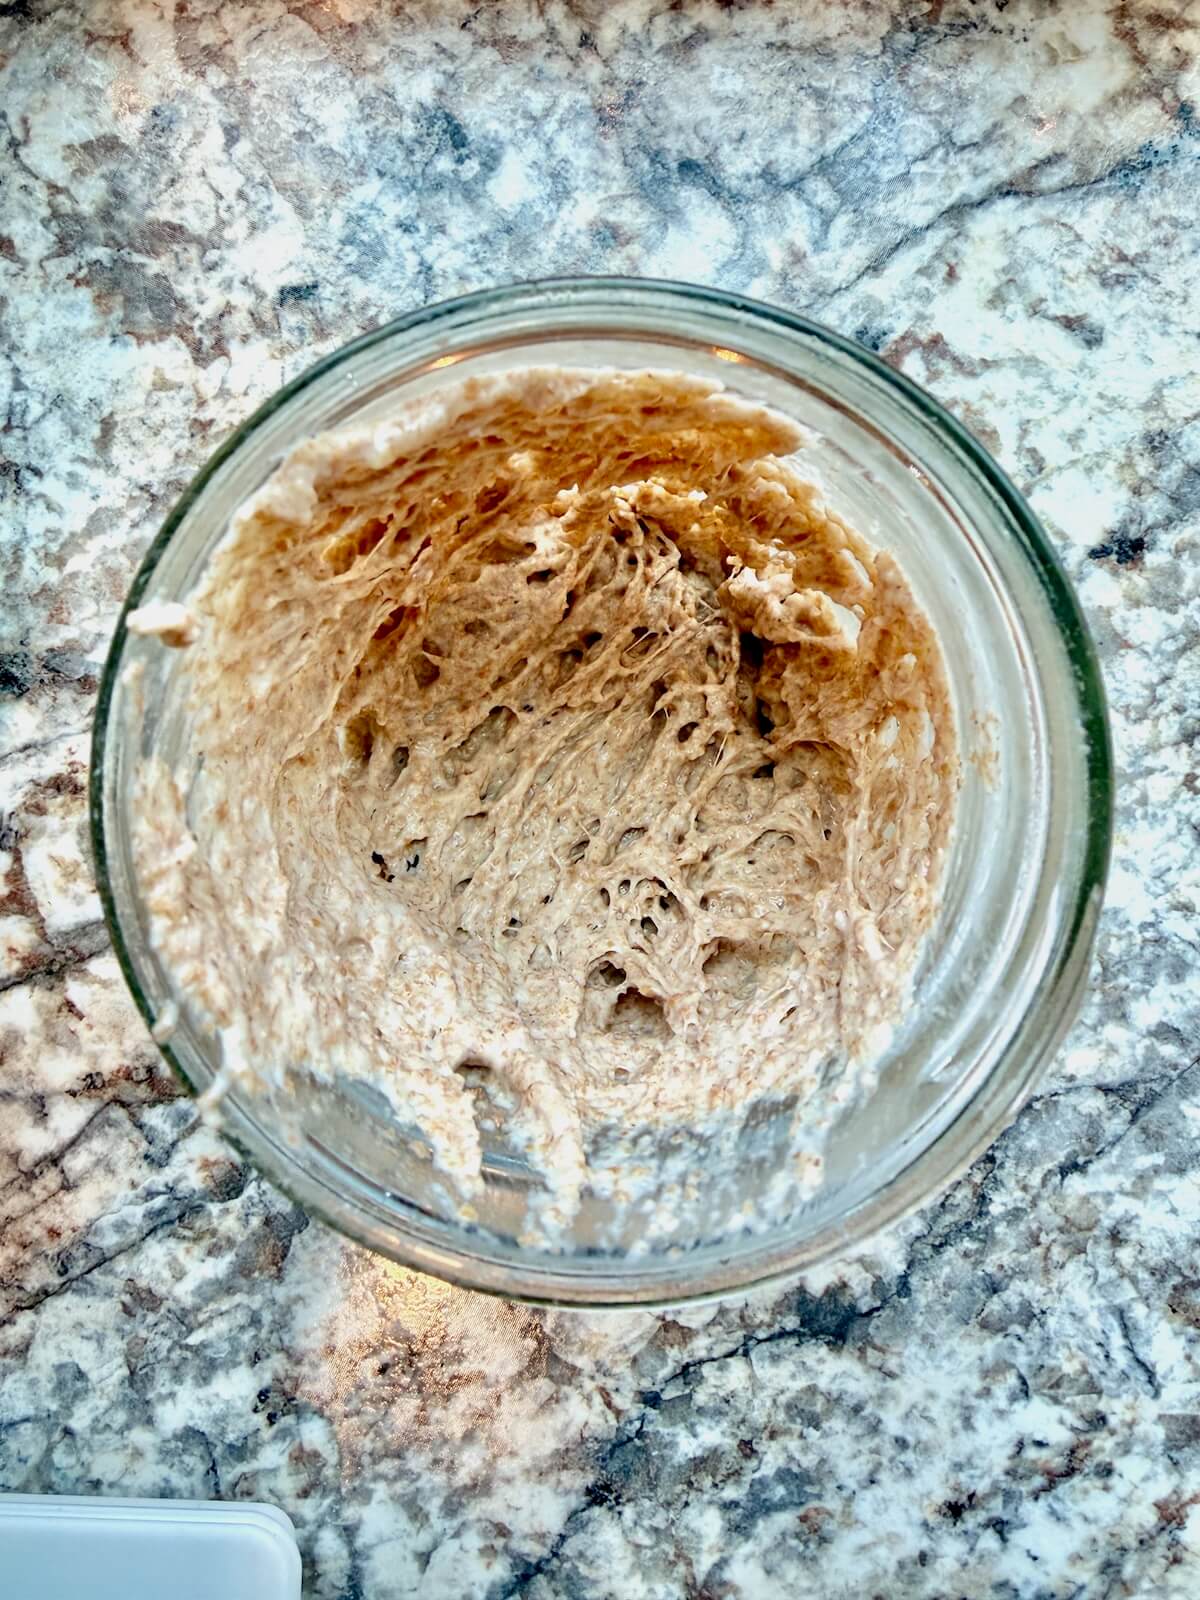
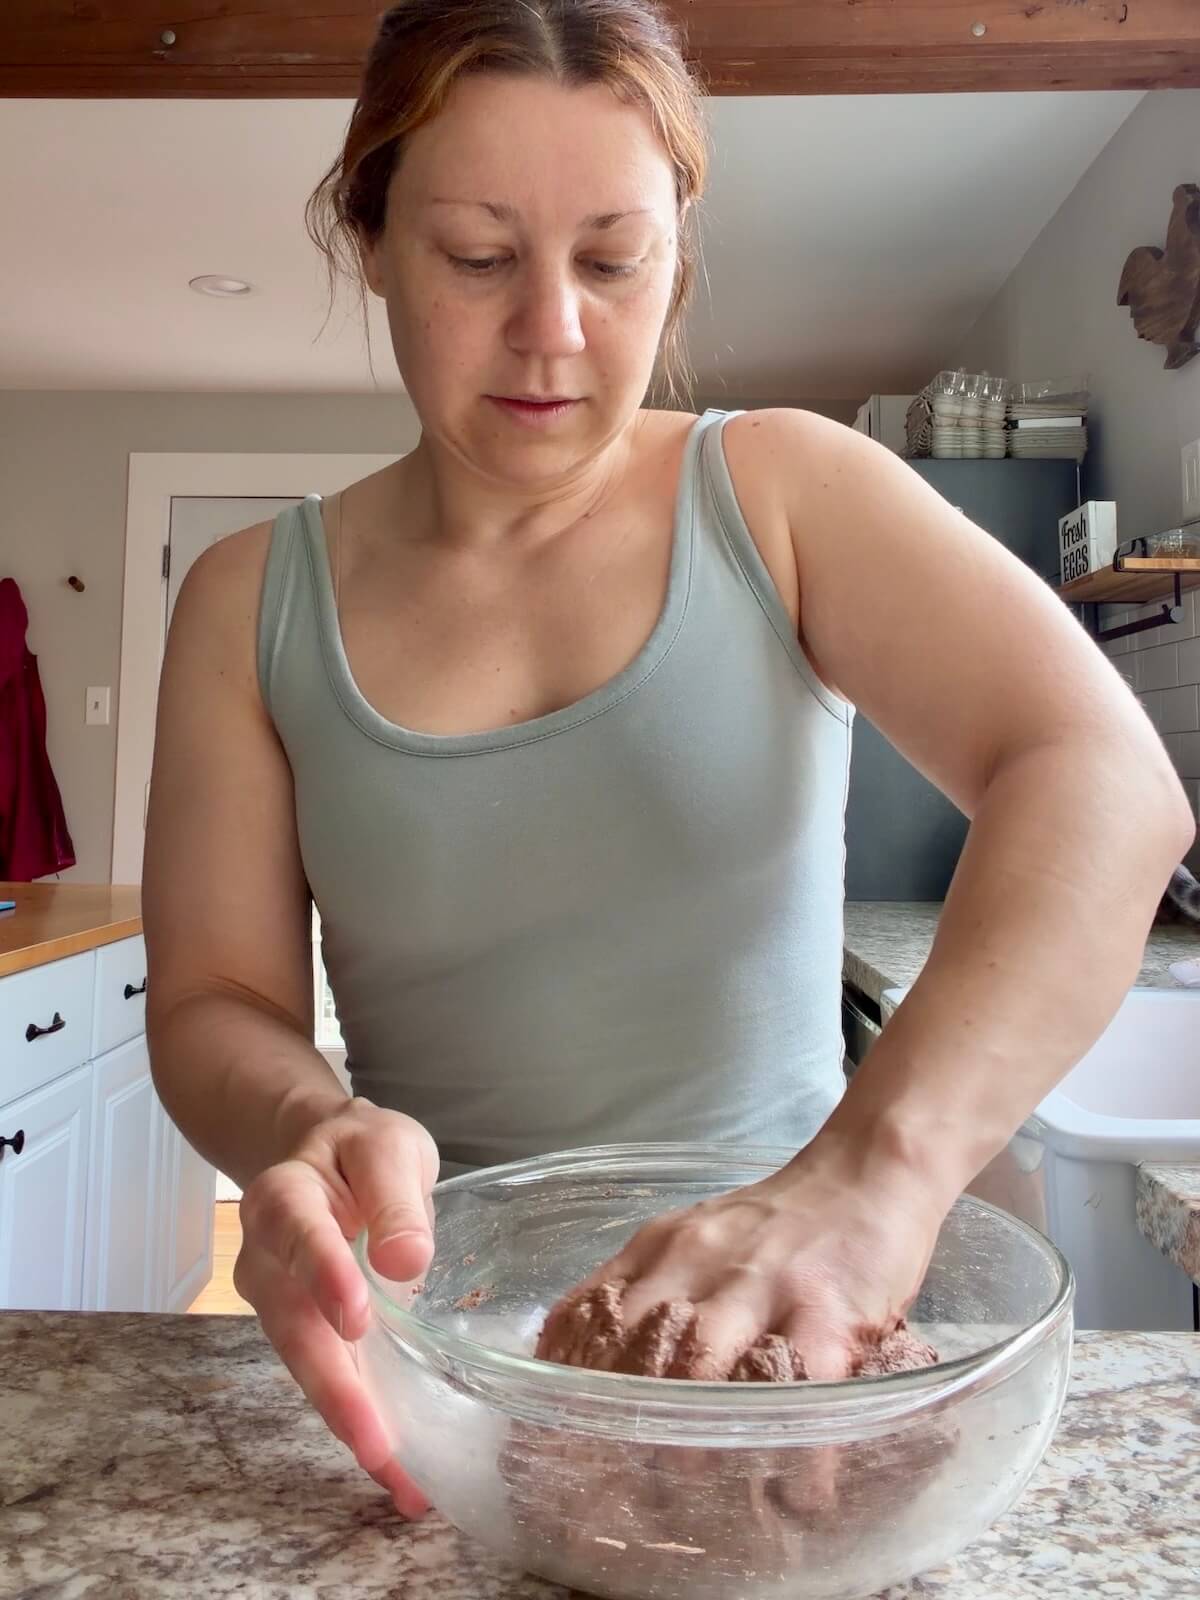
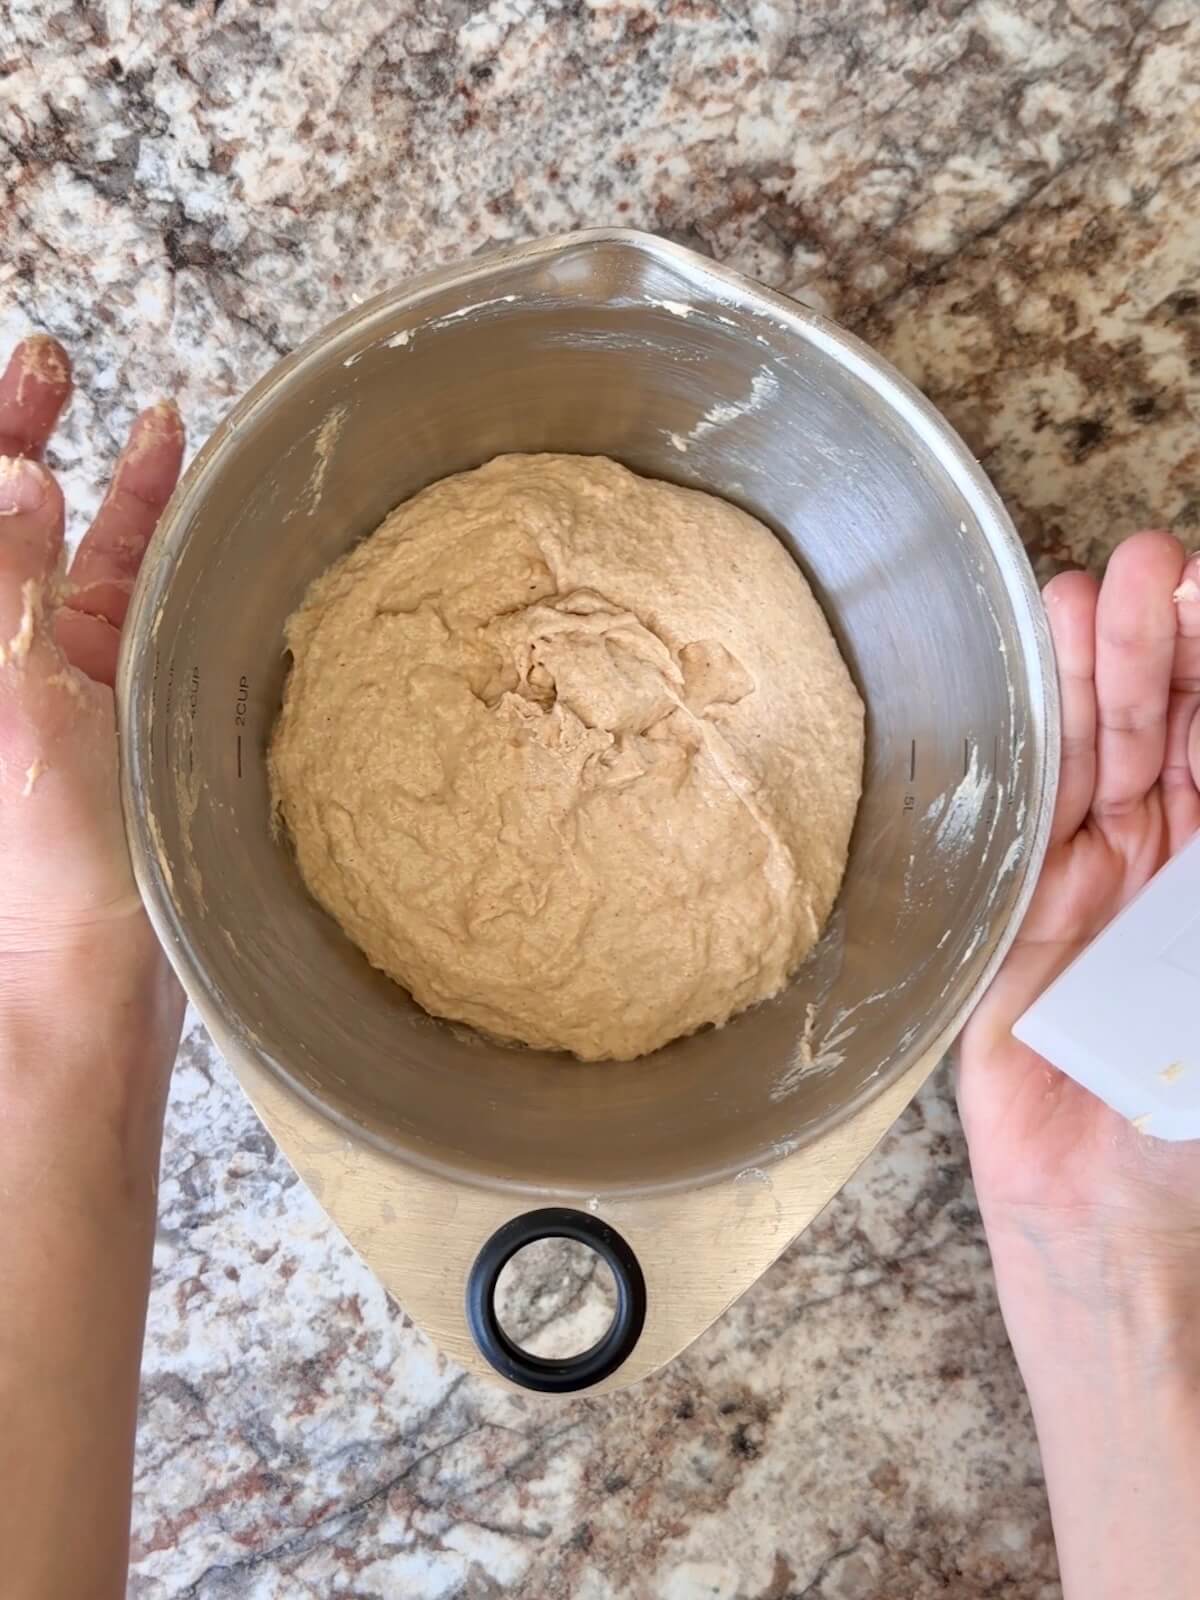
Step 3: Make the doughs. Mix the ingredients for both doughs separately until shaggy doughs form. Cover and rest for 20 minutes.
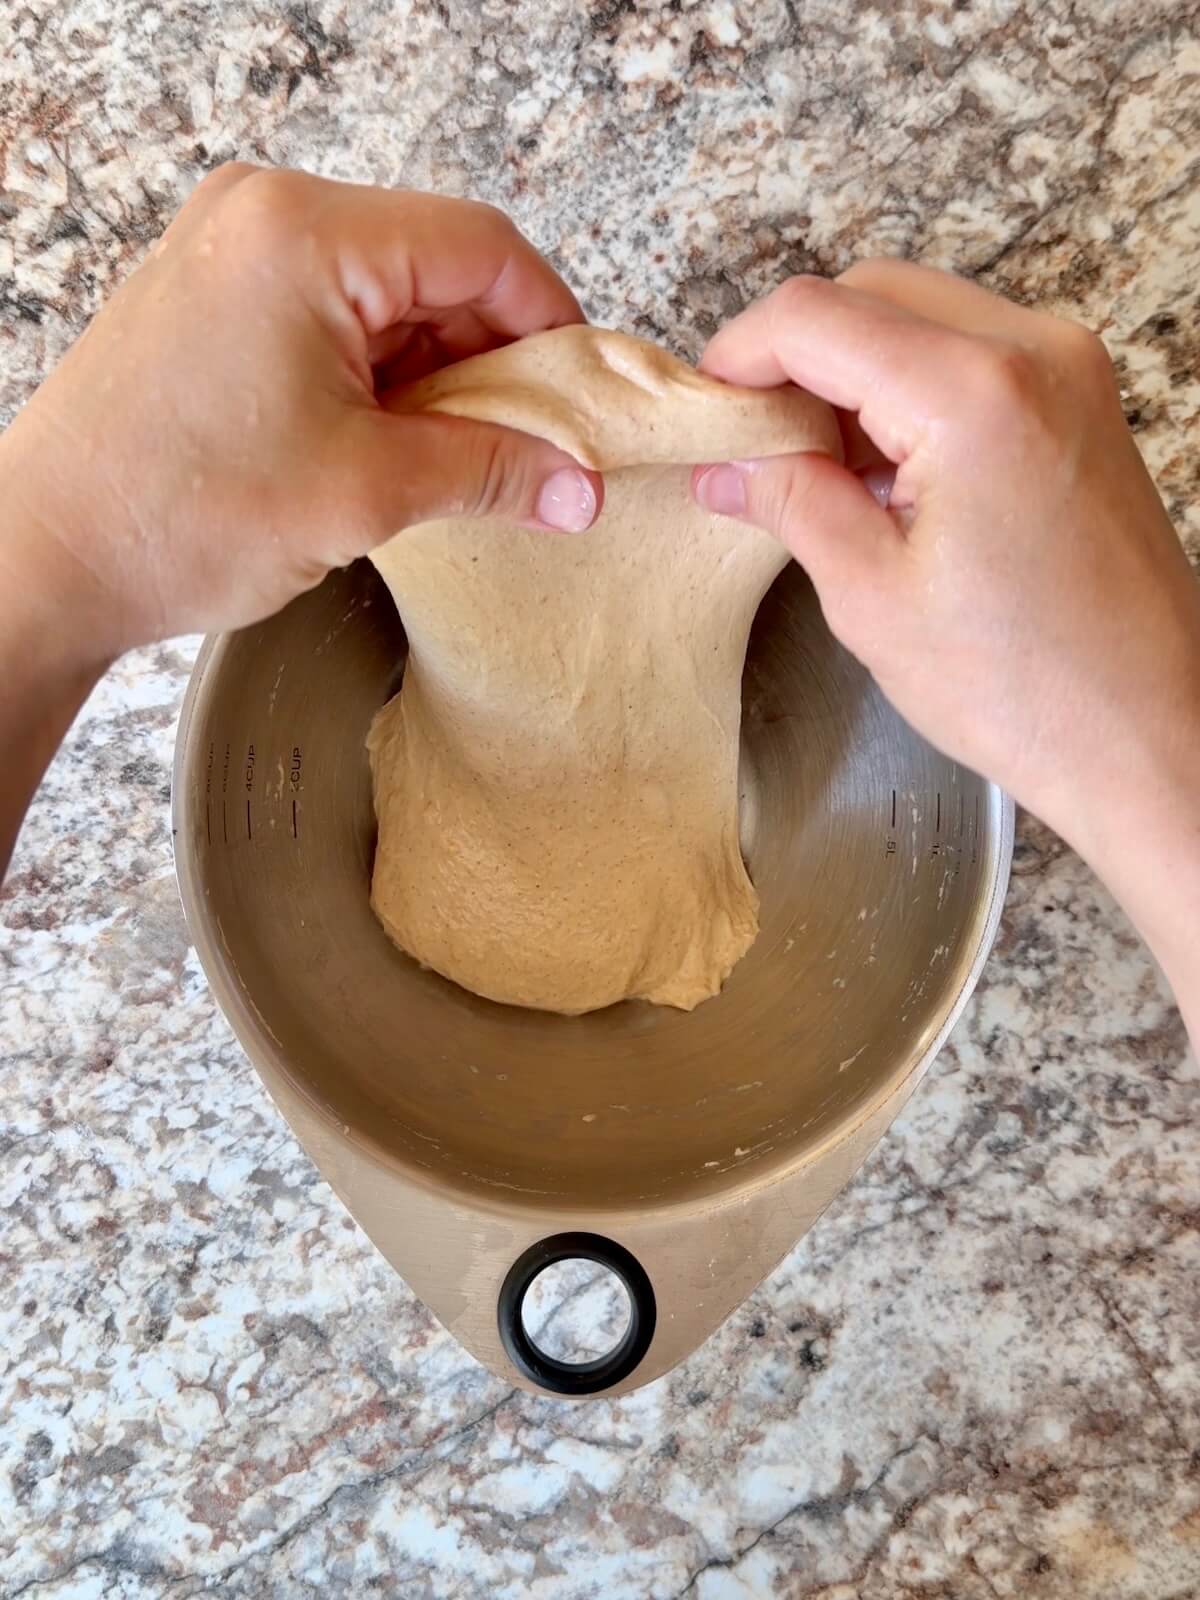
Step 4: Stretch and fold. Perform 4 sets of stretch and folds on each dough separately, resting 15 minutes between each round.
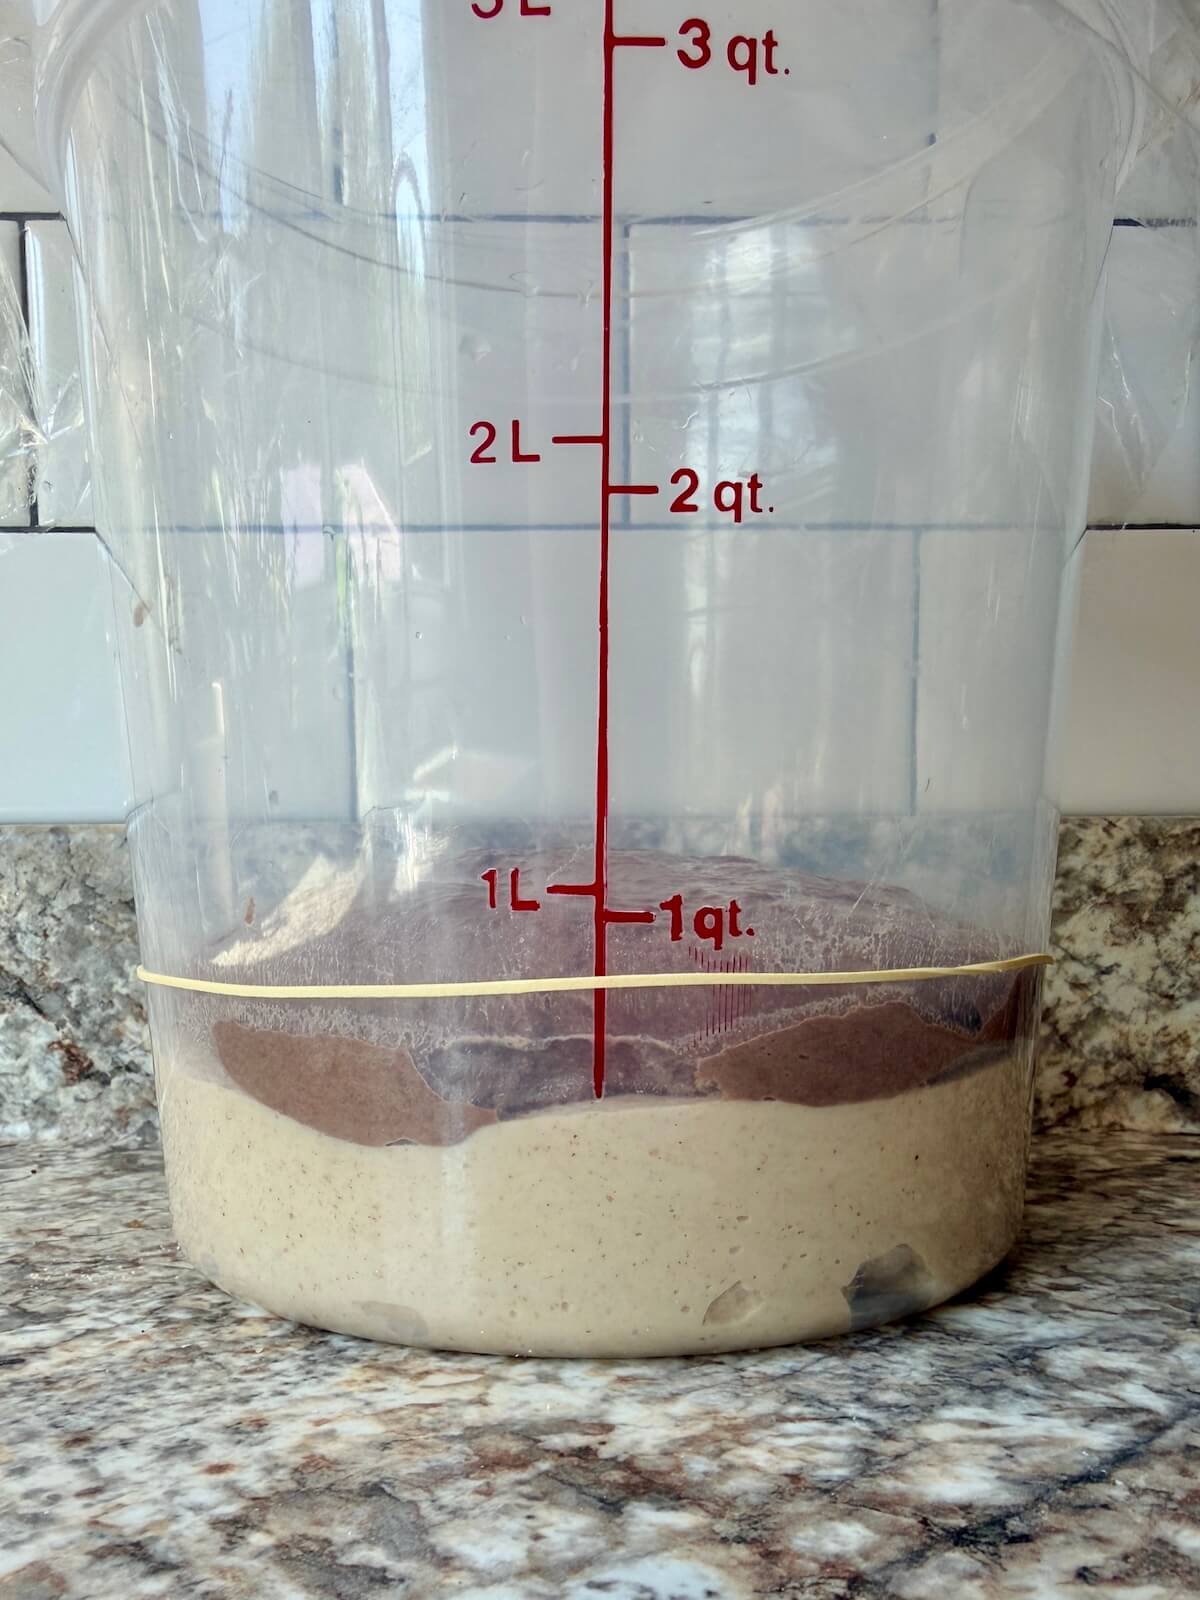
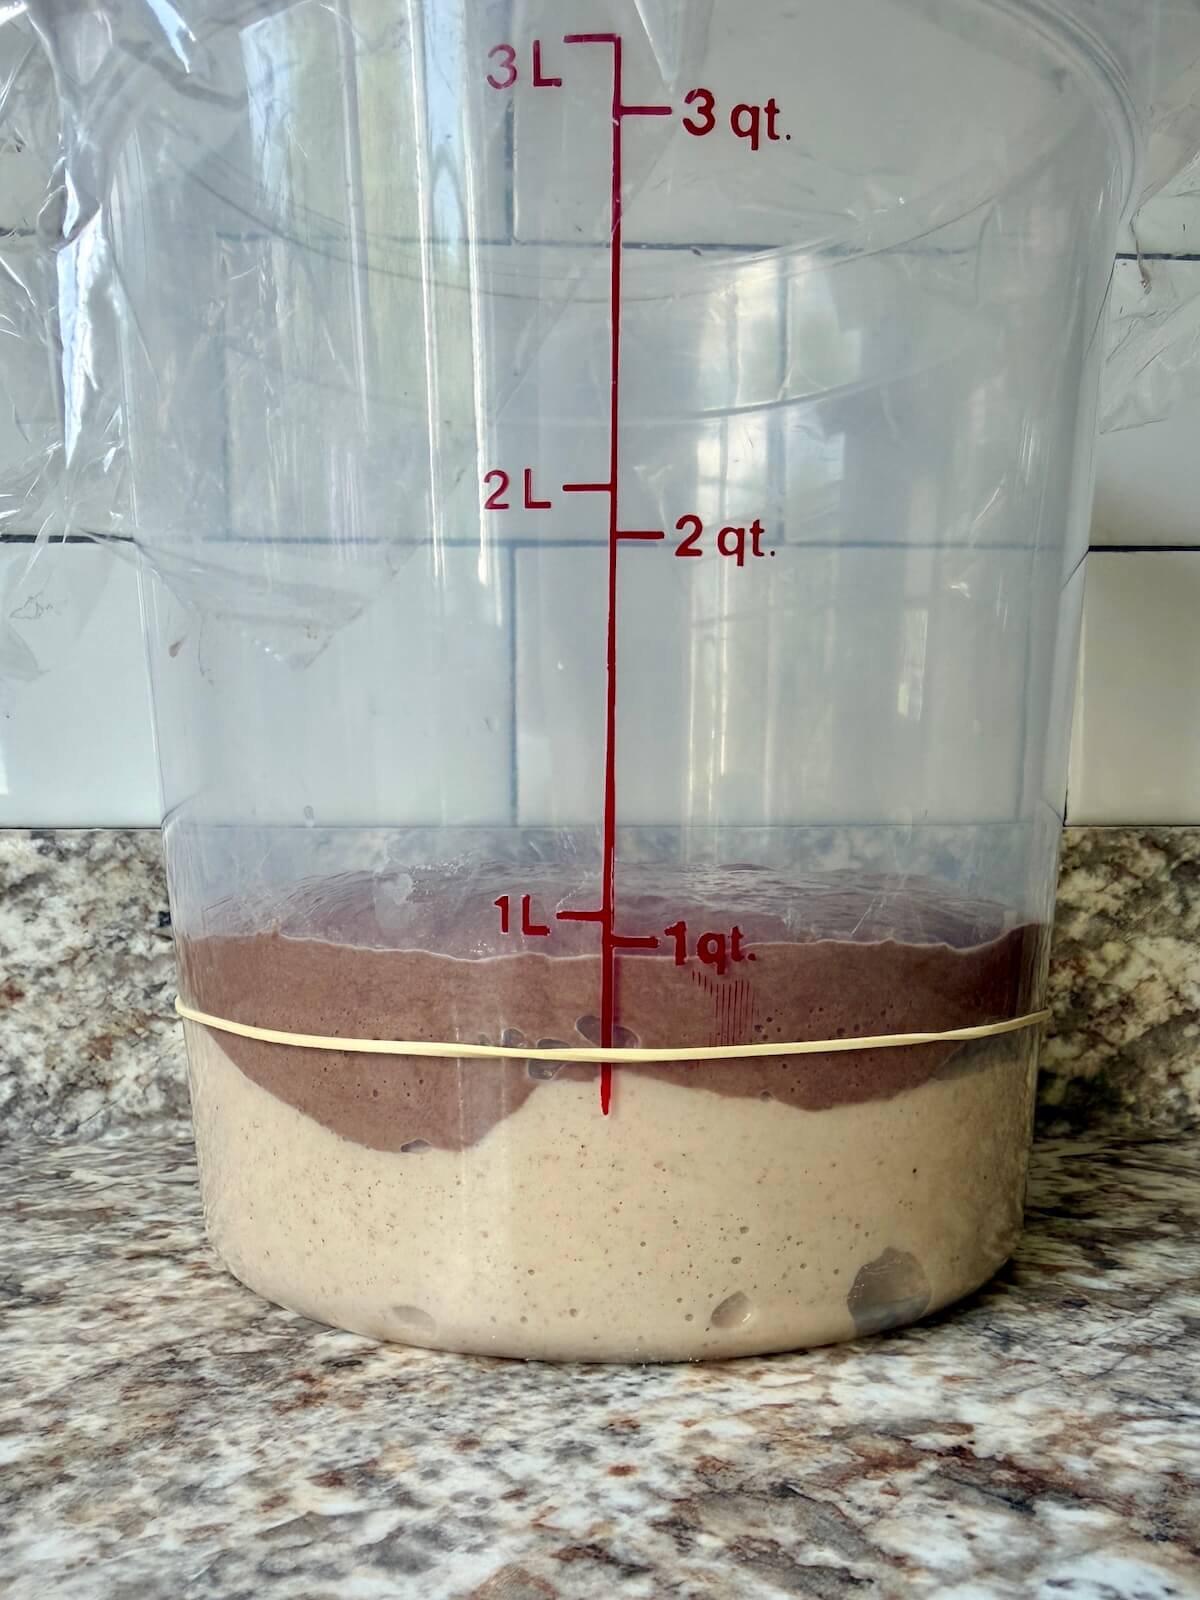
Step 5: Bulk fermentation. Stack the doughs, cover, and let rise until nearly doubled and bubbly, about 4–12 hours.
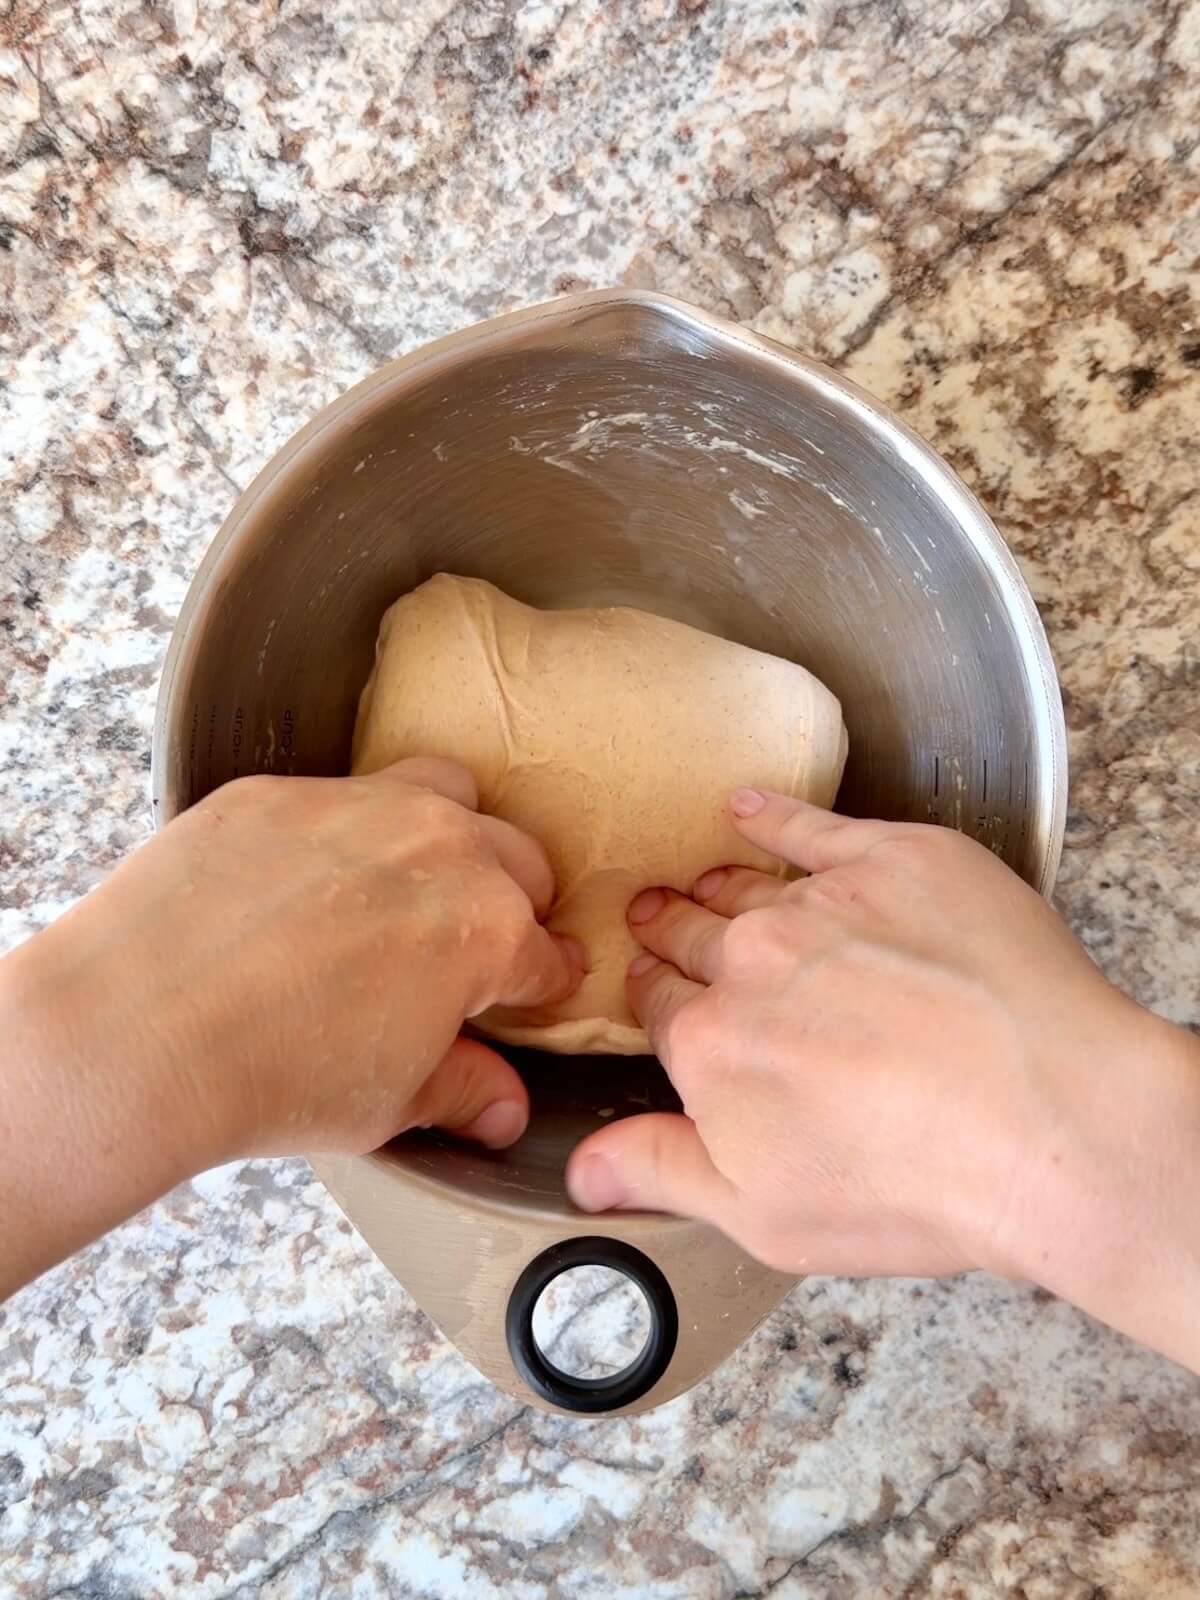
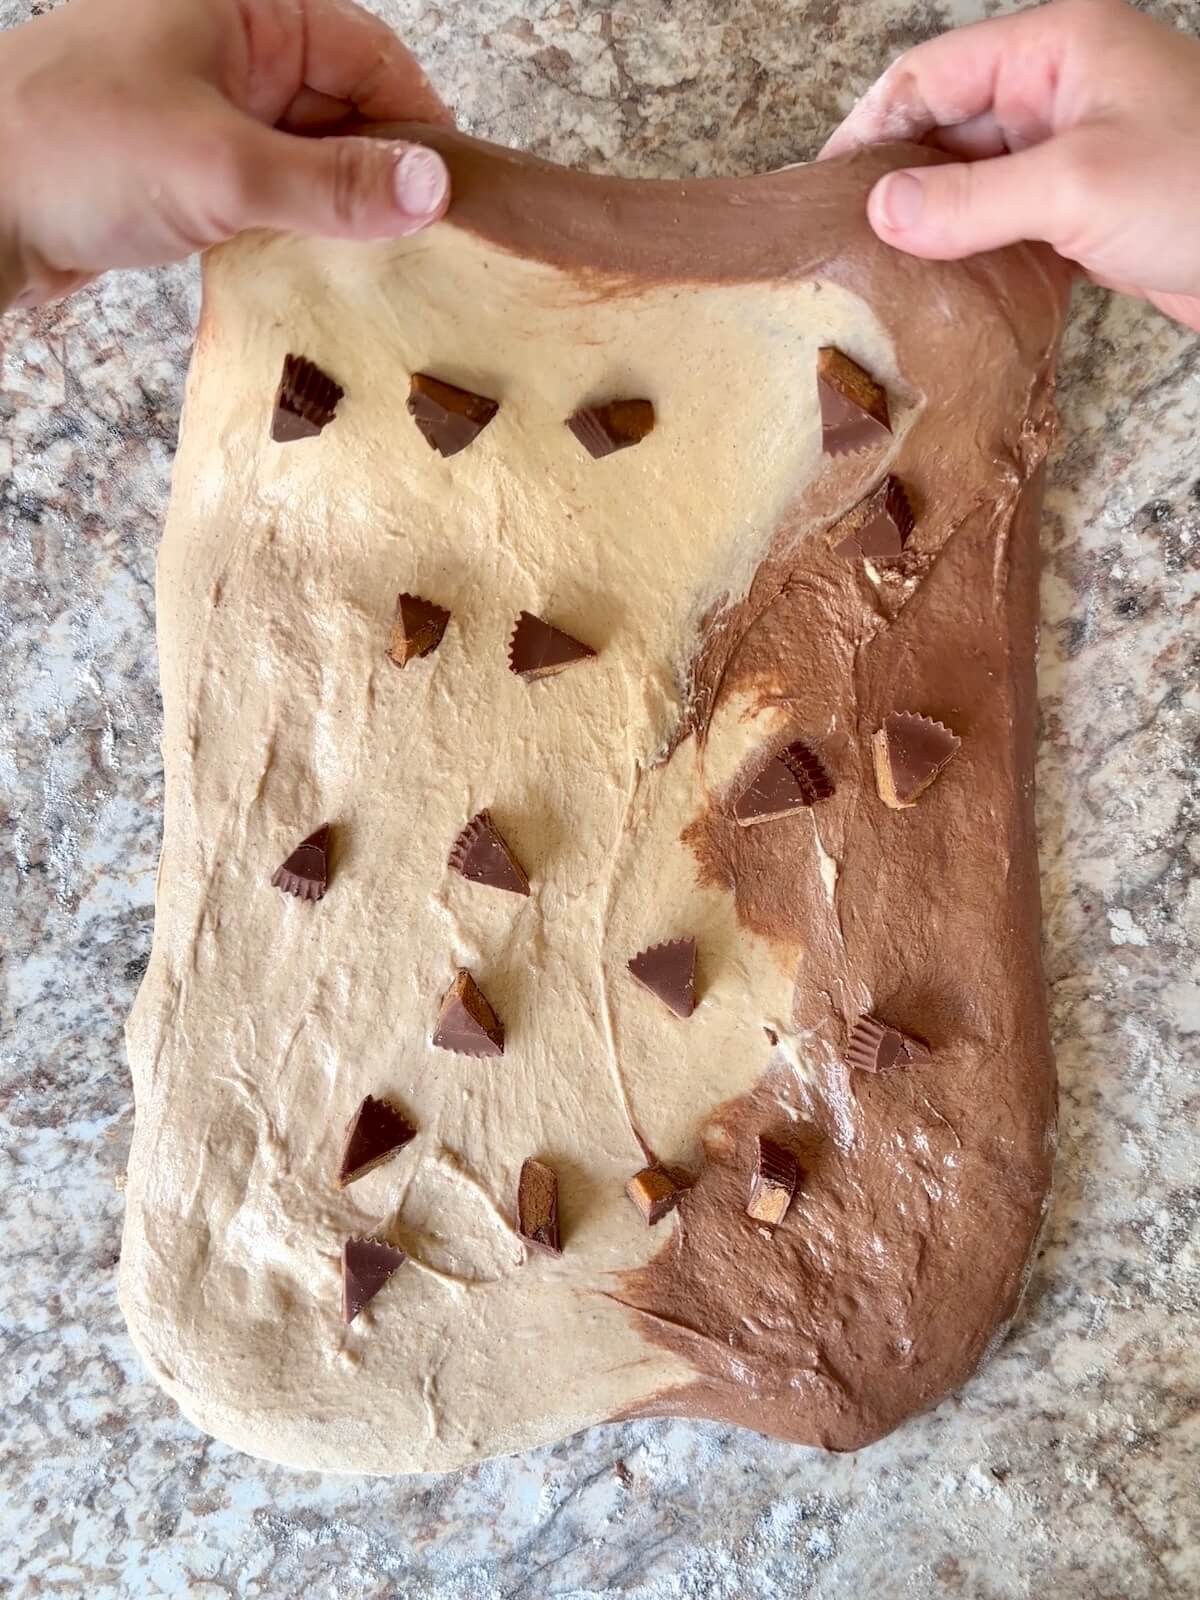
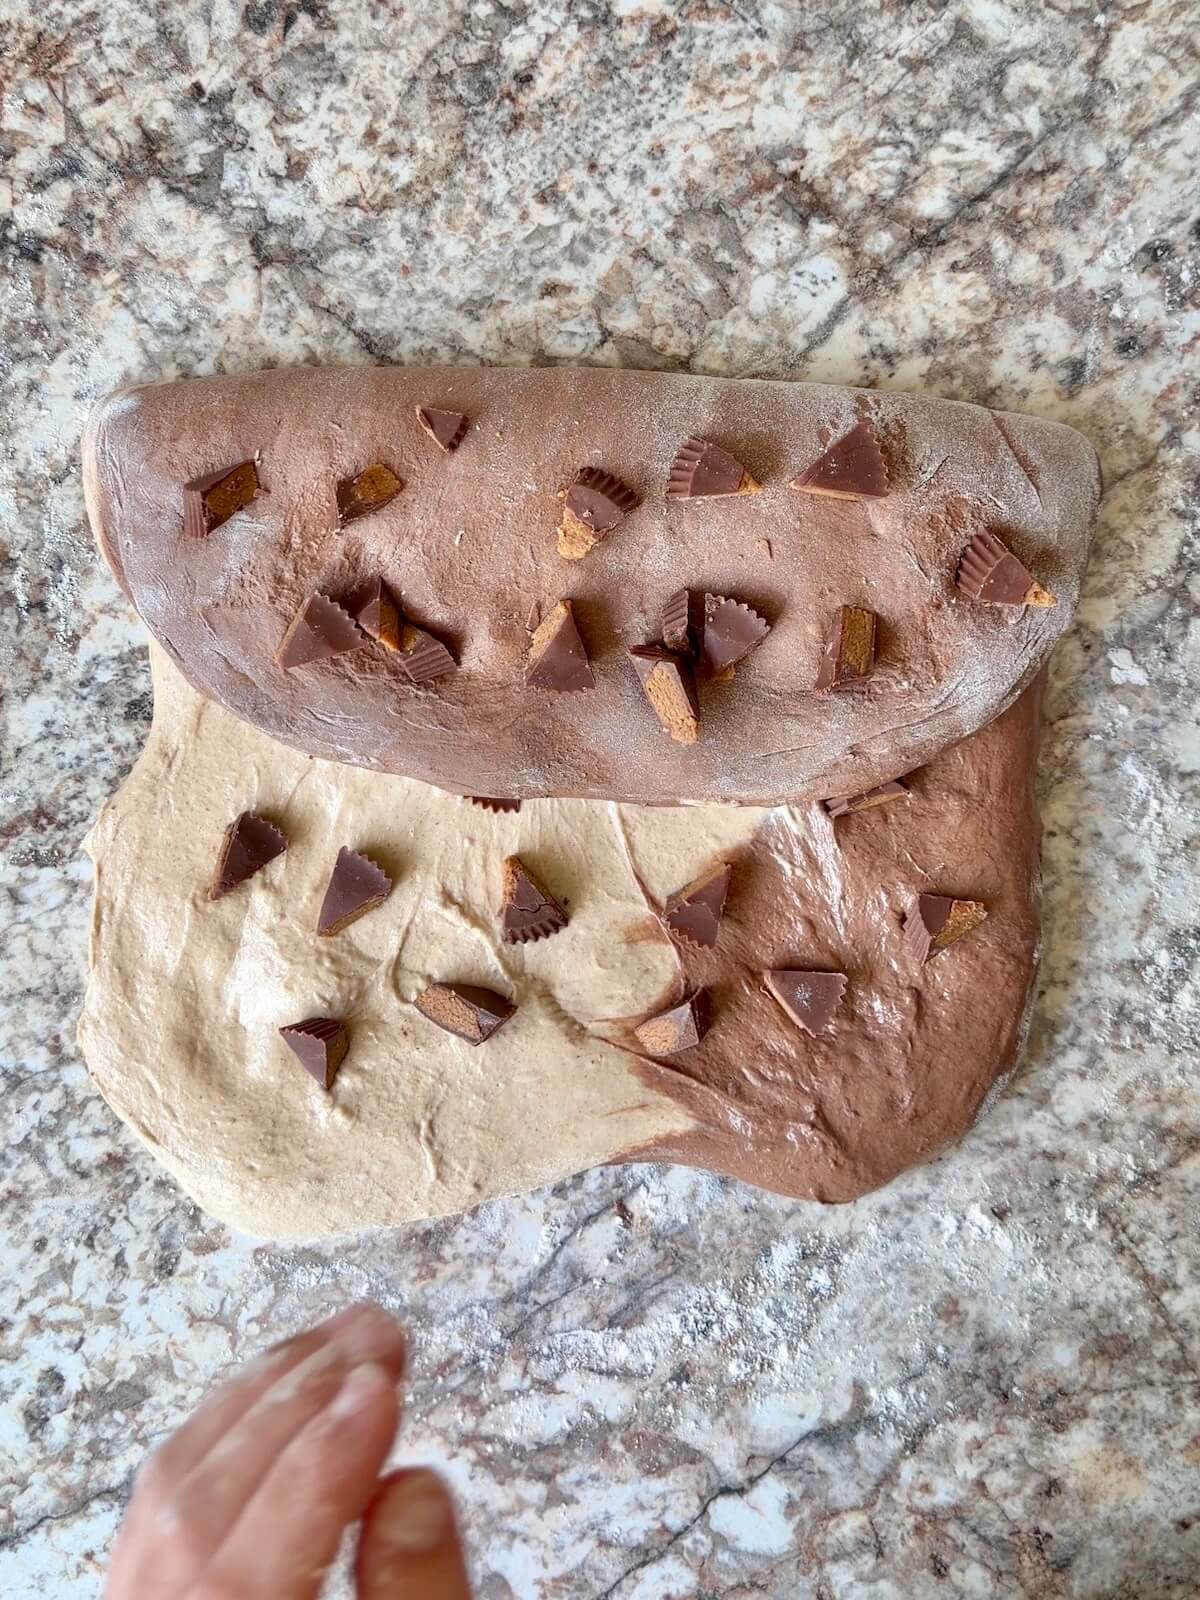
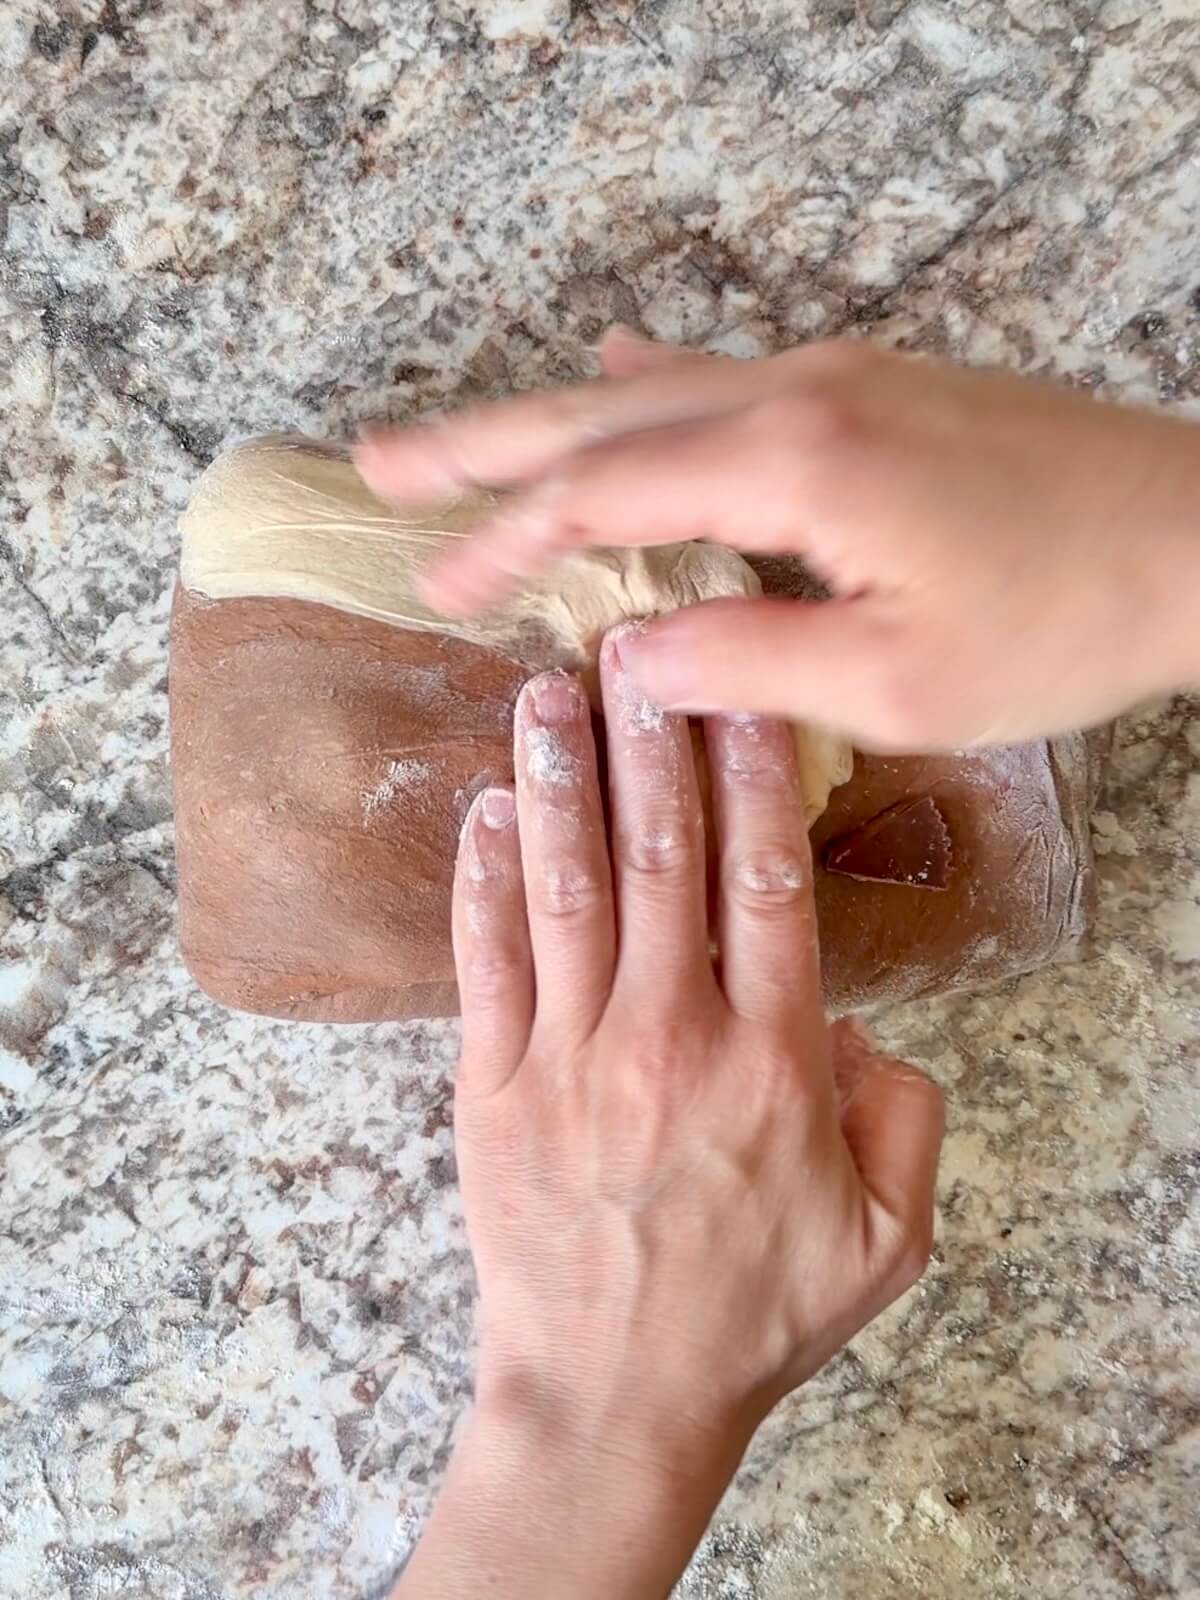
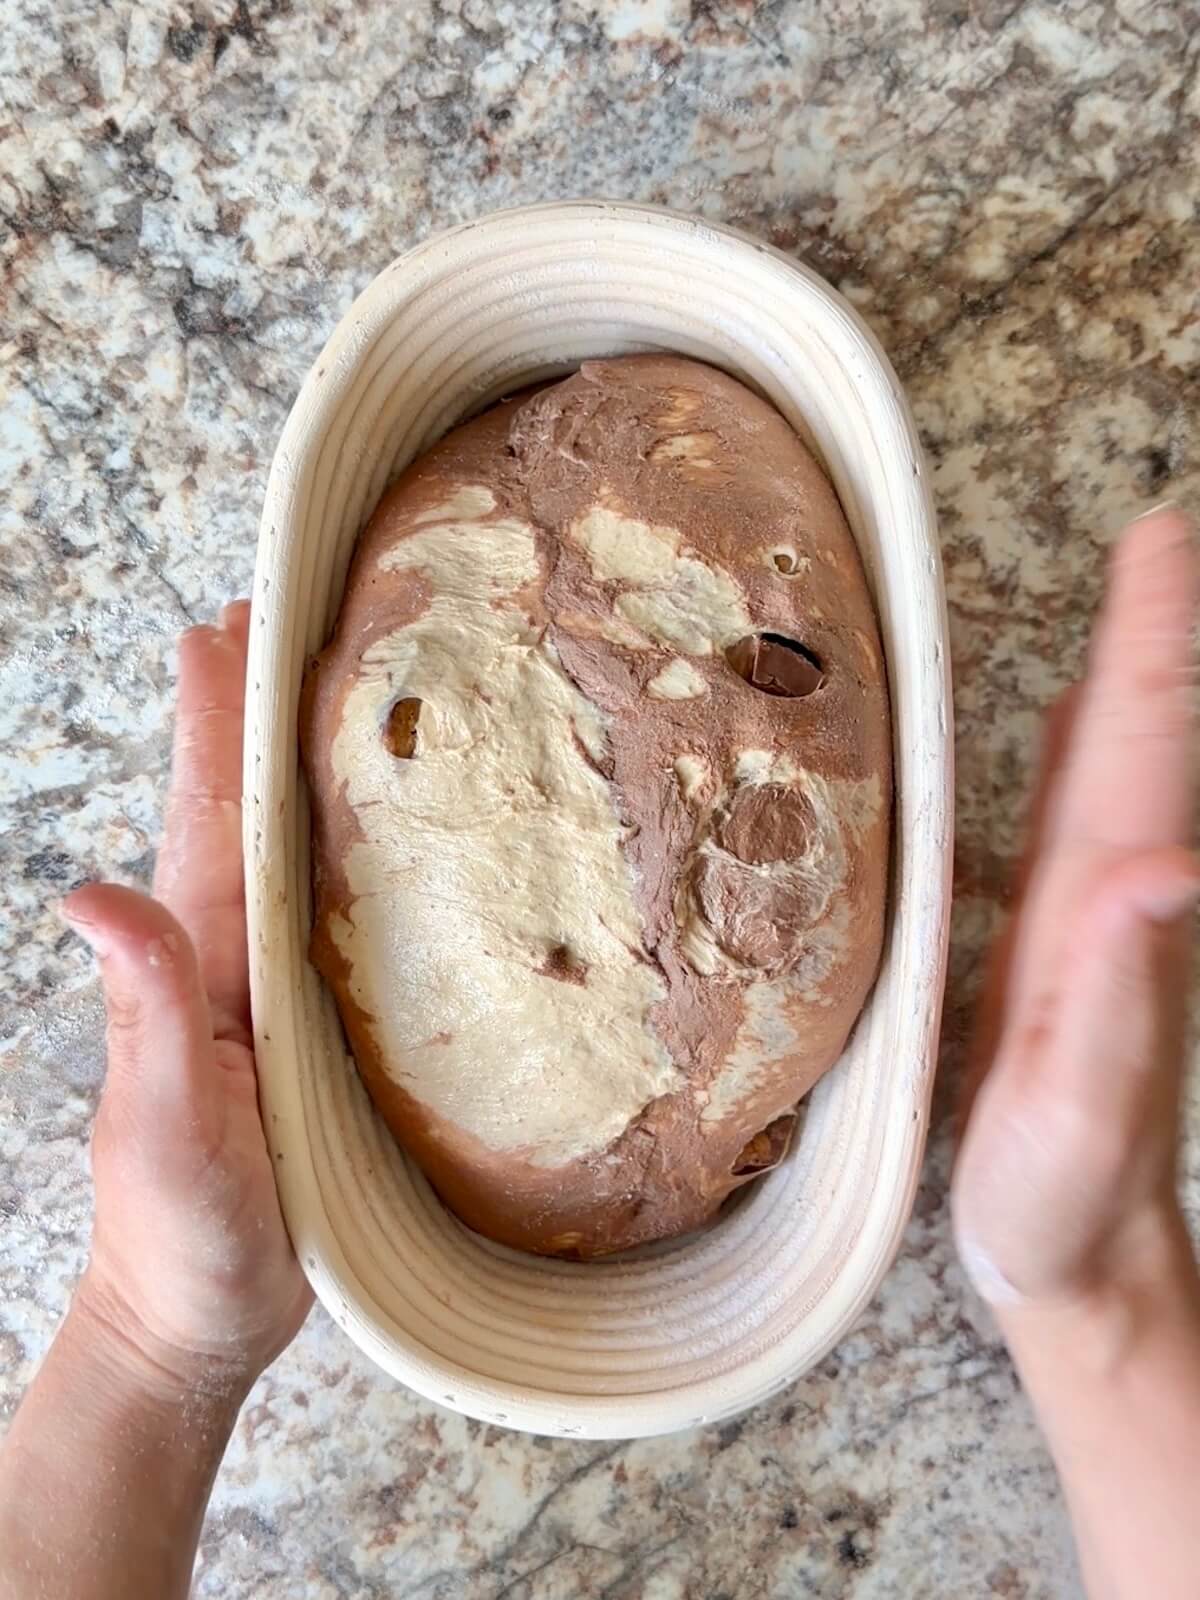
Step 6: Shape. Turn the dough onto a lightly floured surface and gently stretch it into a rectangle. Sprinkle the frozen peanut butter cup pieces over the dough and fold. Then shape into a round ball.
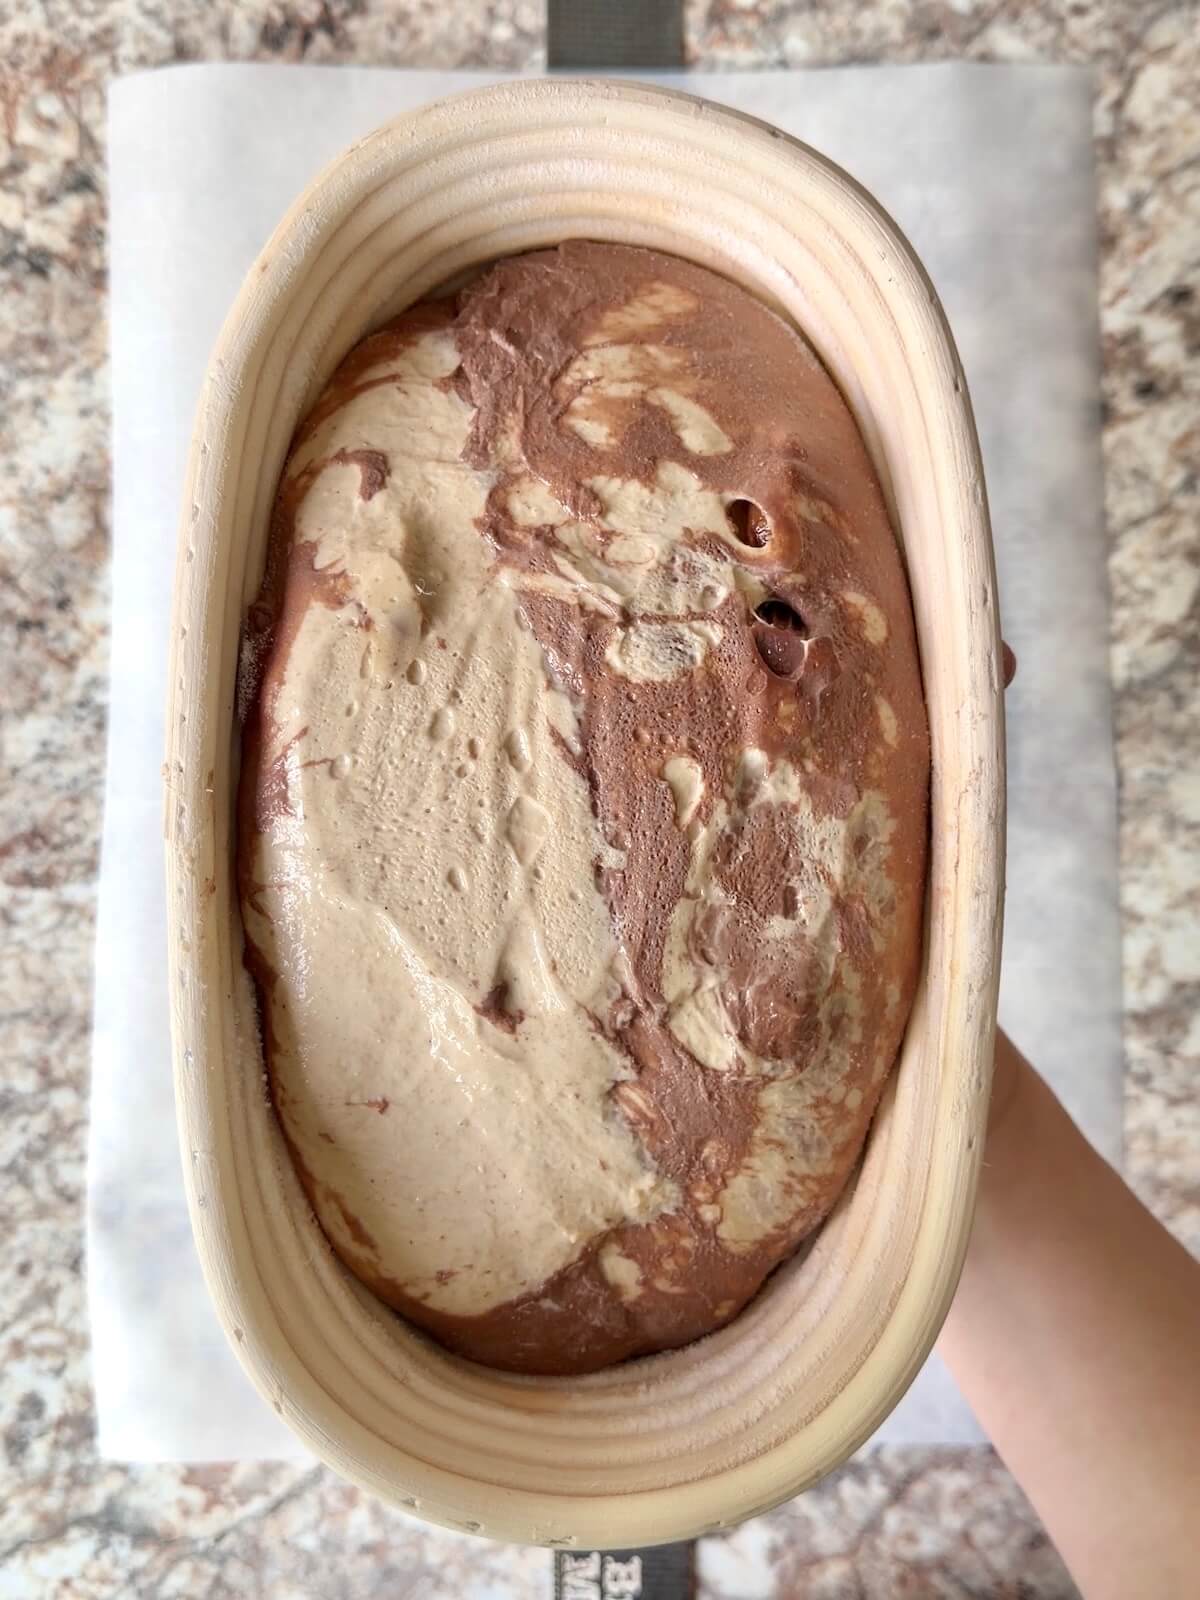
Step 7: Proof. Transfer to a floured proofing basket, cover, and refrigerate overnight.
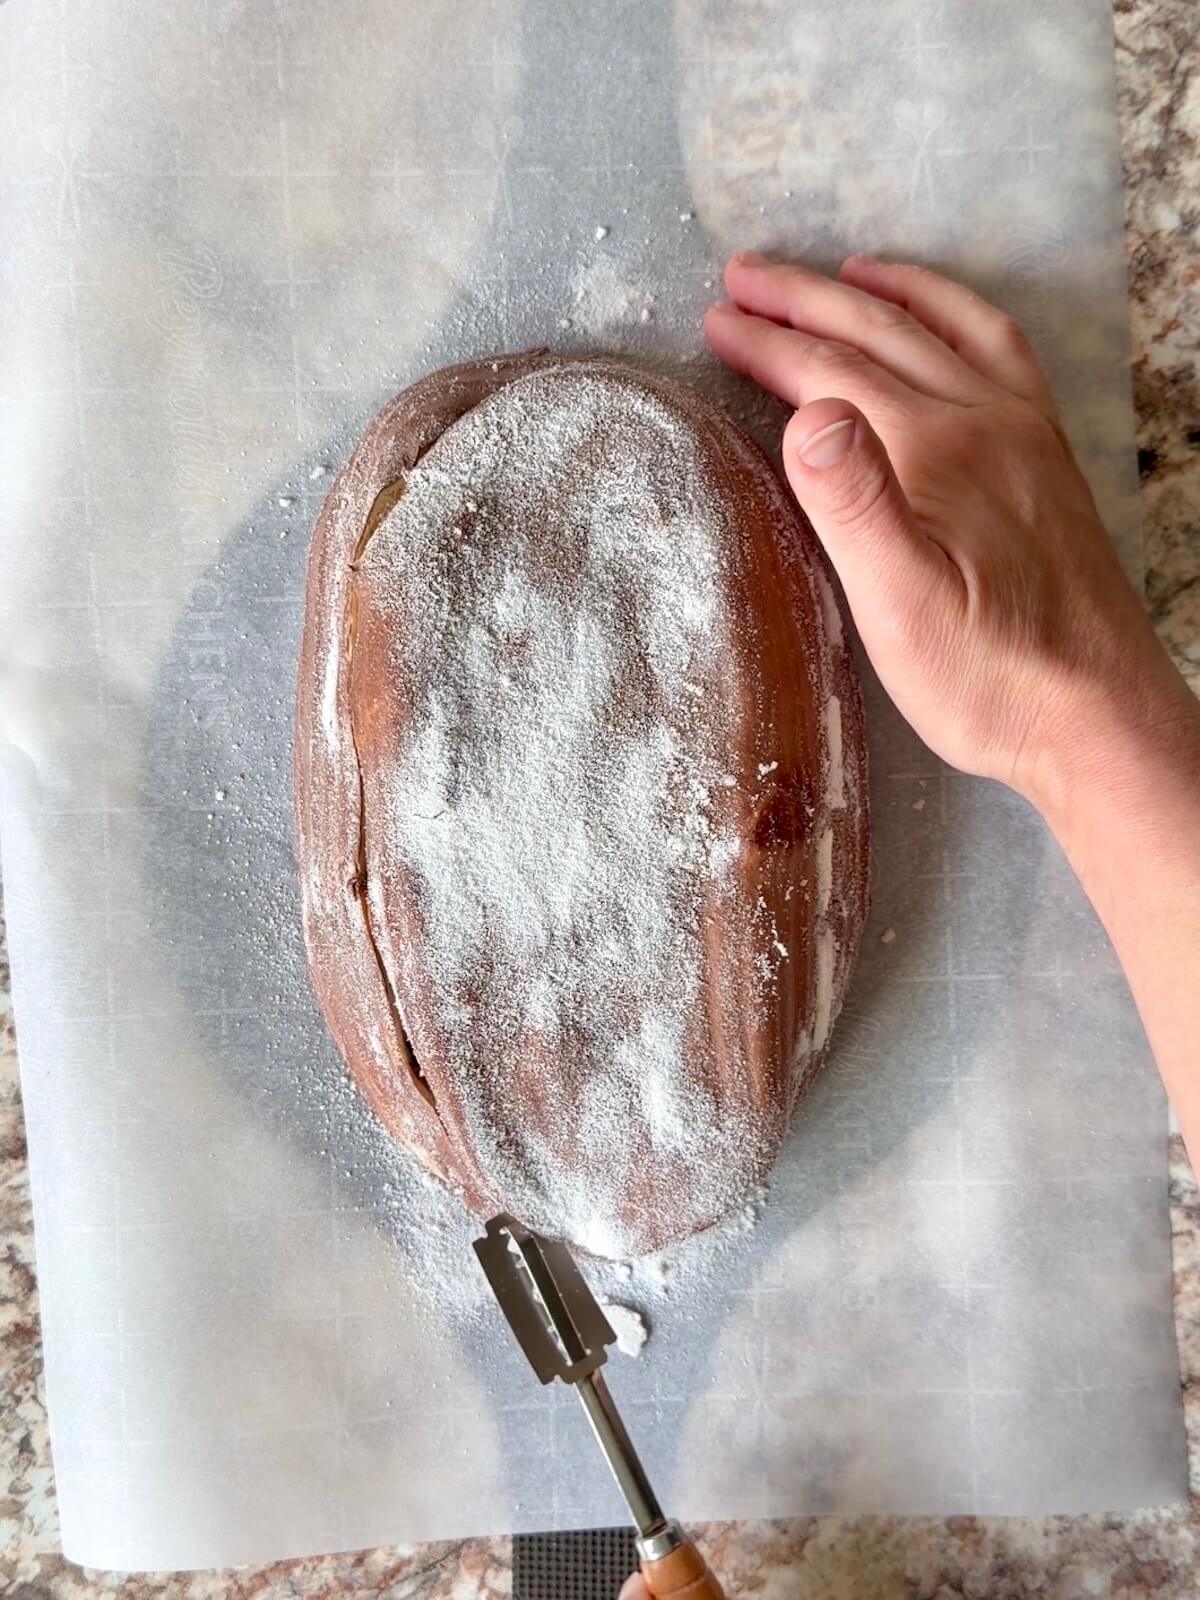
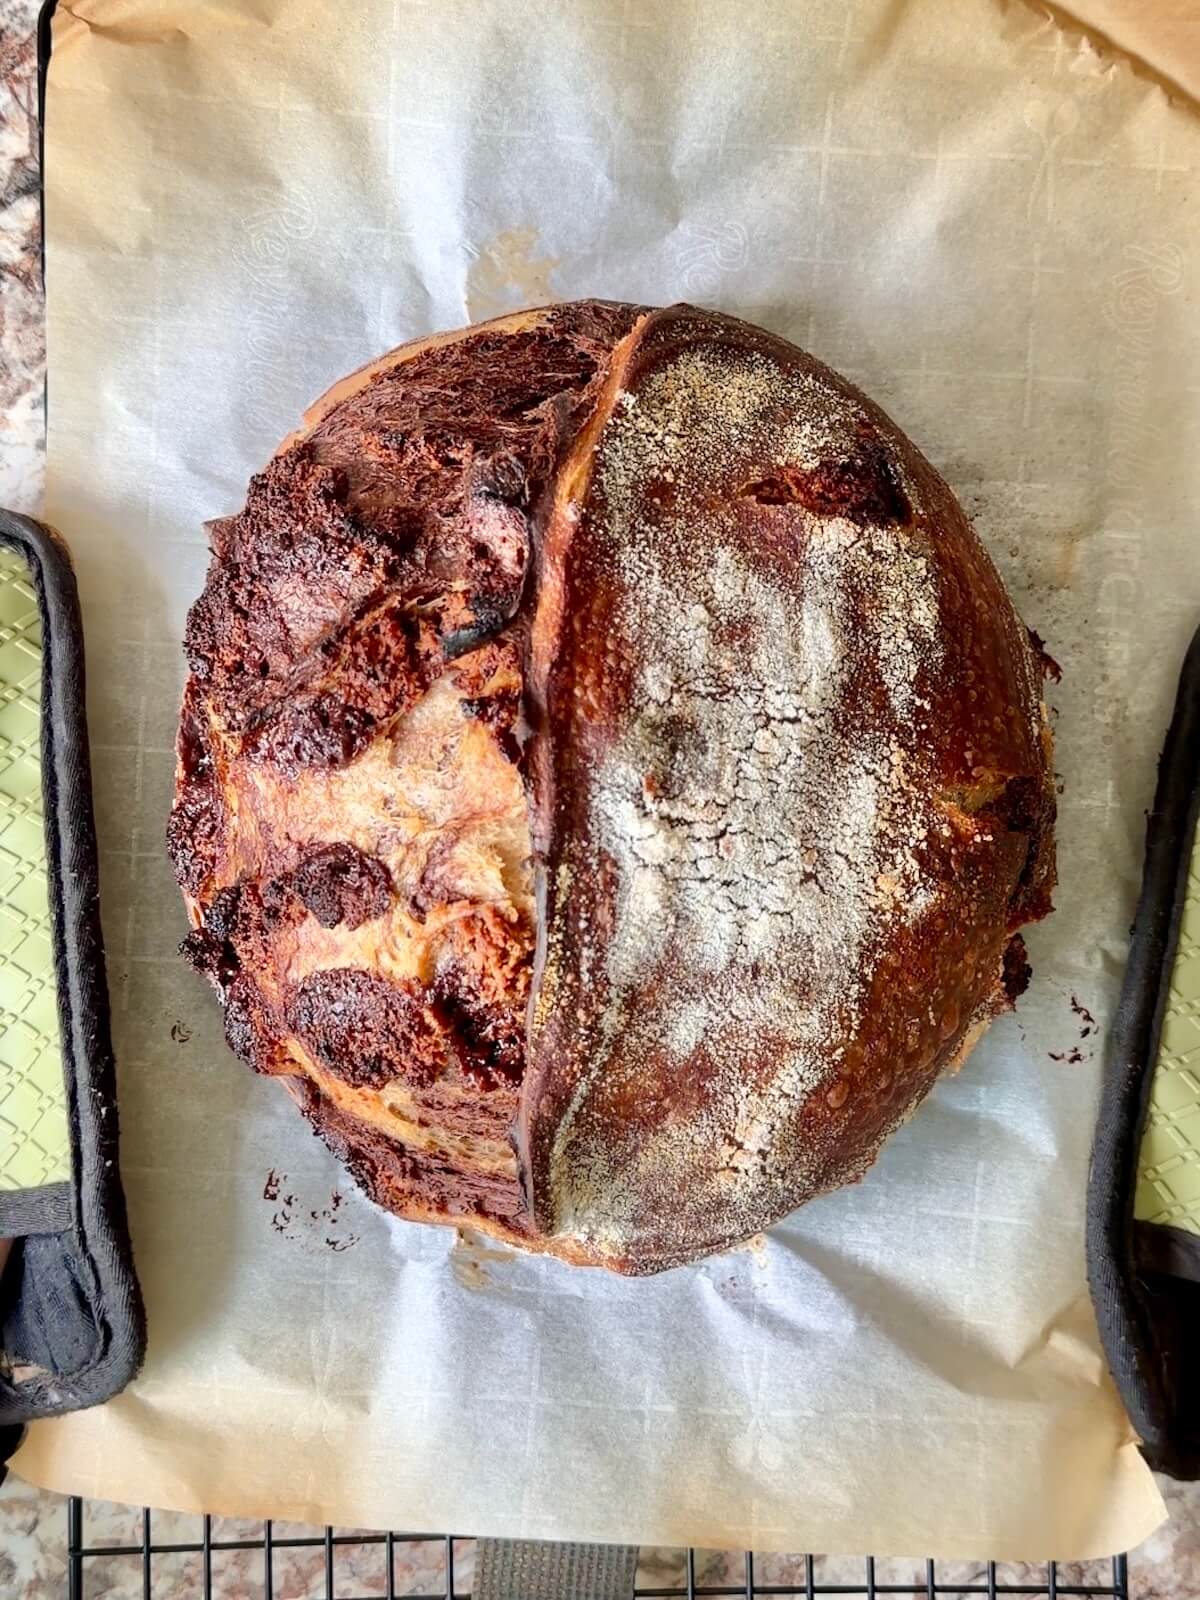
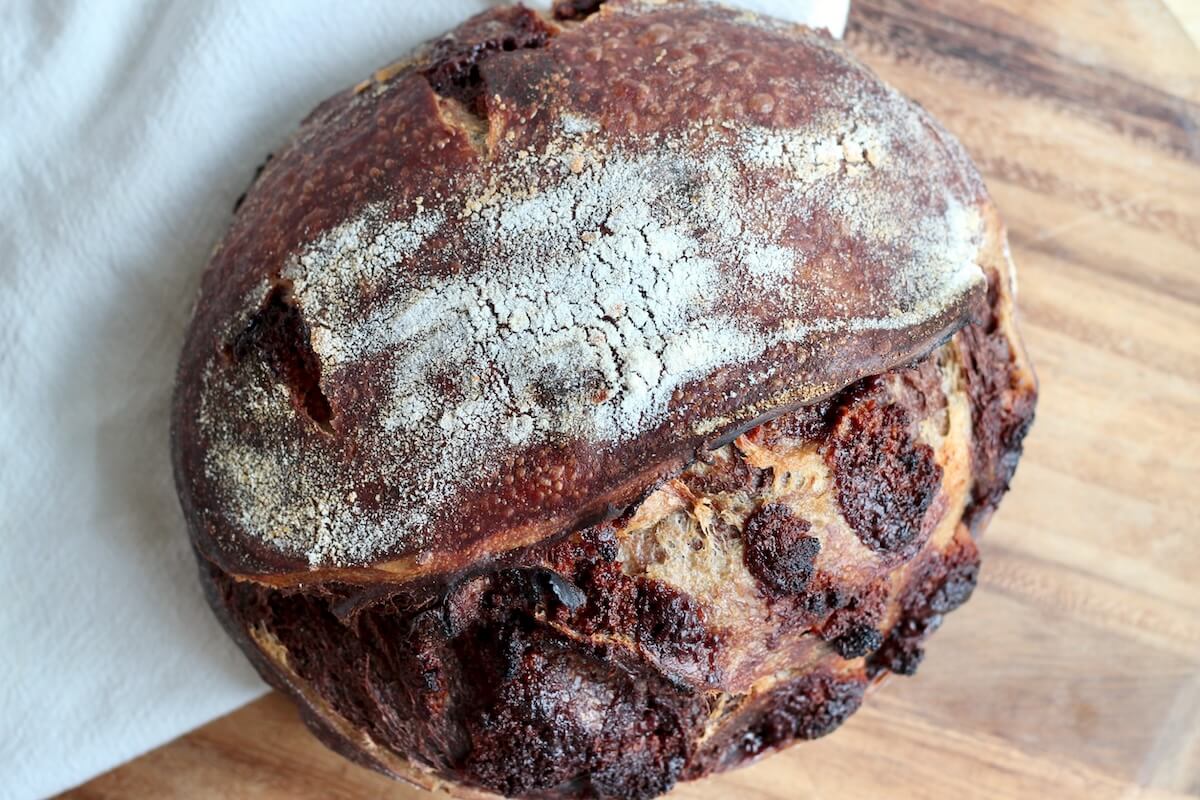
Step 8: Bake. Preheat oven to 450°F with a Dutch oven inside. Score the dough, add 2 ice cubes to the pot for steam, and bake 40 minutes covered, then 5-10 minutes uncovered. Let cool at least 2 hours before slicing.
Baker's Timeline
Here’s a sample timeline to help you plan your peanut butter cup sourdough bread.
- 8:00 PM (Night Before): Feed your starter and freeze peanut butter cups.
- 8:00–8:30 AM: Mix both doughs and let them rest for 20 minutes.
- 8:30–9:30 AM: Perform stretch and folds.
- 9:30 AM–5:30 PM (varies): Bulk fermentation (until nearly doubled in size).
- 5:30–6:00 PM: Shape the dough and add peanut butter cups.
- 6:00 PM–6:00 AM (Next Day): Cold proof in the fridge overnight.
- 6:00–6:45 AM: Bake at 450°F.
- 6:45–8:45 AM: Cool completely before slicing.
Note: Rise times can vary depending on the strength of your starter and the temperature of your kitchen. Always use visual cues—like a dough that has doubled and looks airy—rather than relying strictly on the clock.
How to Store
Store your chocolate peanut butter sourdough (whole or sliced) in a bread box or airtight container at room temperature for up to 2 days.
For longer storage, slice the loaf and freeze it in a freezer-safe bag for up to 3 months. Thaw slices at room temperature or pop them straight into the toaster or oven to warm through.

Are you tired of watching your sourdough discard go to waste?
It’s time to turn excess discard into something delicious with my new ebook - Everyday Sourdough!
Inside, you’ll find 27 tried-and-true sourdough discard recipes that will transform your leftover starter into mouthwatering creations your family and friends will love.
No more guilt about wasting your discard - with Everyday Sourdough, you have endless options to quickly make something amazing anytime.
Let's Connect!
Be sure to leave a comment below if you have any questions. You can also connect with me on Instagram, Facebook, Pinterest, or via email at [email protected].

📖 Recipe
Chocolate Peanut Butter Sourdough Bread
Equipment
- Straight-sided container (optional)
- Proofing basket or bowl lined with tea towel
- Bread sling or parchment paper
- Lame or sharp knife
Ingredients
Chocolate Dough
- ¾ cup + 2 tablespoons (210 grams) water
- ¼ cup (50 grams) active sourdough starter
- 2 cups (240 grams) bread flour
- ⅓ cup (30 grams) cocoa powder
- 1 ¾ teaspoons (5 grams) Diamond Crystal Kosher Salt reduce to 1 teaspoon or measure by weight if using Morton's brand or table salt
Peanut Butter Dough
- ¾ cup + 2 tablespoons (210 grams) water
- ¼ cup (50 grams) active sourdough starter
- 2 cups (240 grams) bread flour
- ⅓ cup (30 grams) peanut butter powder like PB2 powder
- 1 ¾ teaspoons (5 grams) Diamond Crystal Kosher Salt reduce to 1 teaspoon or measure by weight if using Morton's brand or table salt
Other Ingredients
- 6 regular-sized (126 grams) peanut butter cups cut into 8 pieces each and frozen
- Rice flour for proofing basket
- 2 ice cubes for steam
Instructions
- Feed your sourdough starter 6–12 hours before mixing the dough so it is bubbly, active, and ready to use. In cooler kitchens (60–65°F), this may take closer to 12 hours. In warmer kitchens (around 75°F), it may be ready in as little as 6 hours.
- Line a baking sheet or large plate with parchment paper. Cut each peanut butter cup into 8 pieces and arrange them on the prepared surface. Freeze until solid.
- Make the chocolate dough: In a medium bowl, whisk together the water and active sourdough starter. Add the bread flour, cocoa powder, and salt. Mix until no dry flour remains and a shaggy dough forms. Cover and let rest for 20 minutes.¾ cup + 2 tablespoons (210 grams) water, ¼ cup (50 grams) active sourdough starter, 2 cups (240 grams) bread flour, ⅓ cup (30 grams) cocoa powder, 1 ¾ teaspoons (5 grams) Diamond Crystal Kosher Salt
- Make the peanut butter dough: In a second medium bowl, whisk together the water and active sourdough starter. Add the bread flour, peanut butter powder, and salt. Mix until no dry flour remains and a shaggy dough forms. Cover and let rest for 20 minutes.¾ cup + 2 tablespoons (210 grams) water, ¼ cup (50 grams) active sourdough starter, 2 cups (240 grams) bread flour, ⅓ cup (30 grams) peanut butter powder, 1 ¾ teaspoons (5 grams) Diamond Crystal Kosher Salt
- Working with one dough at a time, lightly wet your hands and lift one side of the dough. Stretch it upward and fold it over itself. Rotate the bowl a quarter turn and repeat until all four sides have been folded. Gather the dough into a loose ball and place it seam-side down in the bowl. Cover and rest for 15 minutes. Repeat this process 3 more times, resting 15 minutes between each round, for a total of 4 sets of stretch and folds.
- After the final set of stretch and folds, transfer both doughs to a large straight-sided container, stacking them so one dough sits on top of the other. Do not knead or mix them together. The layers will naturally adhere as they ferment. Cover and let bulk ferment until the dough is puffy, bubbly, and roughly doubled in size. Depending on the temperature of your kitchen and the strength of your starter, this can take anywhere from 4–12 hours.
- Lightly flour your work surface and gently turn out the dough. Carefully stretch it into a rectangle. Scatter one-third of the frozen peanut butter cup pieces evenly over the surface. Fold one short side toward the center, then sprinkle on another third of the peanut butter cups. Fold the opposite short side over the top, then add the remaining peanut butter cups. Fold both long sides toward the center to enclose the filling. Turn the dough seam-side down and gently shape it into a round by cupping your hands around the dough and pulling it toward you.6 regular-sized (126 grams) peanut butter cups
- Dust a proofing basket or towel-lined bowl generously with rice flour. Place the dough inside seam-side up, pinching the seam closed if needed. Cover and refrigerate for 12–16 hours.Rice flour
- The next day, place your Dutch oven (with the lid on) inside your oven and preheat to 450°F. Once preheated, let it continue heating for another 30–60 minutes.
- Turn the dough out onto a sheet of parchment or a bread sling so it’s seam-side down. Score the top with a lame or sharp knife. Carefully place 2 ice cubes inside the Dutch oven for extra steam. Lower the dough into the pot, cover, and bake for 40 minutes. Remove the lid and bake for another 5–10 minutes until the crust reaches your desired color.2 ice cubes
- Transfer the bread to a wire rack and cool for at least 2–4 hours before slicing.
Notes
- Storage: Store in an airtight container at room temperature for up to 2 days or freeze for up to 3 months.

Comments
No Comments