These Pickled Banana Peppers are the perfect way to preserve your summer harvest. Easy to make with just a saucepan and glass jar, this quick refrigerator pickle recipe requires no special canning equipment. Serve them with snack boards, sandwiches, salads, burgers, pizza, and so much more.

My love for pickled banana peppers started with a simple seed packet mix-up.
What I thought were jalapeño pepper seeds actually turned out to be banana peppers. And at first, I was a little disappointed.
What was I going to do with a bunch of banana peppers?
Little did I know that these tangy, crunchy, savory pickled peppers would soon become a staple in my kitchen. From sandwiches and burgers to pizza and nachos, the versatility of pickled banana peppers is endless.
Today, I’m walking you through how to make the best pickled banana peppers, including which ingredients to use, tips that will guarantee they turn out right the first time, and some of my favorite ways to use this easy pickled peppers recipe.
Disclaimer: Some links throughout this post are affiliate links. As an Amazon Associate, I earn from qualifying purchases. You can learn more by visiting my Affiliate Disclosure Page.
Why You'll Love This Recipe
- Quick & Easy- Refrigerator pickled banana peppers only take 20 minutes to prepare and require just a few simple ingredients. The hardest part is waiting for them to finish brining!
- No Canning Required- No need to boil your jars or break out the canning equipment for this quick pickled banana pepper recipe. It's home food preservation made easy!
- Flavorful- Homemade pickled banana peppers taste fresher and more flavorful than store-bought.
- Versatile- Enjoy these pickled peppers as a snack, as part of a charcuterie board, or on pizza, sandwiches, salads, and more.
- Preserve Your Harvest- If you have more banana peppers in your garden than you know what to do with, this easy pickling recipe is a great way to preserve them for months to come.
- Great for Gifting- It may be summer now, but the holiday season will soon be upon us. Homemade pickled peppers are a delicious, thoughtful, and unique gift your friends and family will love.
Ingredient Notes
Here are some notes on key ingredients. For a full list of ingredients, check out the recipe card below.
- Banana Peppers- Slightly sweet and mild, banana peppers are perfect for pickling. Choose yellow, unripe banana peppers for a crispier, crunchier texture.
- Garlic- Crushed fresh garlic cloves infuse the brine with a savory garlic flavor.
- White Vinegar- A great choice for pickling, white vinegar is clear and has a neutral, tangy flavor. The acidity of the vinegar helps preserve the banana peppers.
- Water- Used to dilute the vinegar and balance the acidity of the brining liquid.
- Kosher Salt- Kosher salt or pickling salt is preferred for pickling because it does not contain additives like iodine and anti-caking agents that can affect the brine's clarity and taste.
- Granulated Sugar- Balances the acidity, adds a touch of sweetness, and aids in preserving the peppers.
- Mustard Seeds- Adds a slightly spicy, tangy flavor to the brining liquid.
- Black Pepper- Either whole black peppercorns or coarse ground black pepper can be used in this recipe.
🌱 Sustainability Tip: Choose locally-grown banana peppers or grow them in your own garden to reduce the environmental impact of food transportation.

When to Pick Banana Peppers for Pickling
For optimal pickled banana peppers, harvest them when they reach their mature size of 4-5 inches and have turned pale yellow with shiny skin. This is when they will be the most crunchy.
While they can be picked after they have ripened and turned red, it's best to choose unripe, yellow banana peppers for pickling.
However, banana peppers are enjoyable at any ripeness, so don't worry too much about timing!

Substitutions and Variations
Here are a few ways you can try customizing this quick pickled banana peppers recipe to fit your diet and taste preferences.
Substitutions
- Banana Peppers- Swap banana peppers for Hungarian wax peppers, pepperoncini peppers, or jalapeño peppers.
- Garlic- Replace fresh garlic cloves with 1 teaspoon of garlic powder. Alternatively, use sliced shallots or red onion to give the pickles a different flavor.
- White Vinegar- Apple cider vinegar can be used in place of distilled white vinegar.
- Kosher Salt- Substitute kosher salt with pickling salt or sea salt. It is not recommended to use table salt for pickling.
- Granulated Sugar- Swap granulated sugar for honey or maple syrup to give the pickles a slightly different flavor.
- Mustard Seeds- Use a ¼ teaspoon of mustard powder in place of whole mustard seeds.
- Black Peppercorn- For a spicier pickling brine, replace black peppercorn with red pepper flakes.

Variations
- Sweet- Omit the kosher salt, black pepper, and garlic. Add ⅓ to ½ cup of granulated sugar to the brine to make sweet pickled banana peppers.
- Spicy- For spicy pickled banana peppers, add a few sliced jalapeños or another chili pepper into the mix. Alternatively, add red pepper flakes to the brining liquid.
- Pepper Medley- Have a variety of peppers growing in your garden? This quick pickle recipe can be used to preserve them all. Mix, match, and get creative with your pickled peppers!
Equipment Notes
Here are some notes on any special equipment I used to make this recipe.
- Saucepan with Pour Spout- A small saucepan made with stainless steel or another non-reactive material works best. Using a saucepan with a pour spout makes pouring the brine over the peppers super easy.
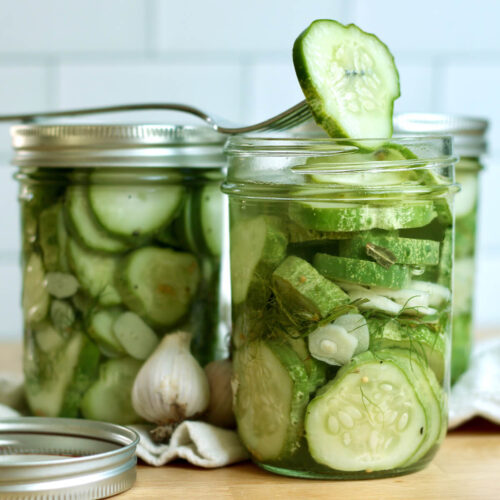
- Glass Mason Jars- This recipe is written to make one pint-sized mason jar full of pickled banana peppers. Always use a clean jar with a tight-fitting lid that is free from rust.
How to Make Pickled Banana Peppers
Here is how to pickle banana peppers.
Step 1: Prepare the brine. In a small saucepan, combine the kosher salt, granulated sugar, mustard seeds, and black peppercorns. Pour in the white vinegar and water, stirring to combine.
Step 2: Heat the brine. Place the saucepan over medium-low heat and heat the mixture until it's hot but not boiling, making sure to whisk occasionally so the salt and sugar fully dissolve. Once hot, remove the saucepan from the heat and set it aside to cool slightly while you work on the peppers.


Step 3: Crush the garlic. Crush the 4 cloves of garlic and place them at the bottom of a pint-sized mason jar.

Step 4: Slice the banana peppers. Trim both ends of the banana peppers and use a small knife to remove the seeds and membranes. It's okay if a few seeds remain, but try to remove most of them. Slice the banana peppers into rings about ¼ to ½ inch thick.
Step 5: Fill the jar with peppers. Place the sliced banana peppers into the mason jar with the crushed garlic.


Step 6: Add the brine. Carefully pour the brining liquid over peppers and garlic in the jar. Leave about a ½ inch of space at the top of the jar.

Step 7: Seal the jar and cool. Seal the mason jar tightly with the lid. Give the jar a good shake to ensure that every pepper ring is in contact with the brining liquid. Let the jar cool to room temperature on your kitchen counter.
Step 8: Let the peppers pickle. Once cooled, store the jar in the refrigerator. Allow the pickled banana peppers to brine for at least 2 days before enjoying. The longer they sit, the more flavorful they'll become. Pickled banana peppers will last up to 6 months or longer in the refrigerator.

Tips for Success
Make these easy pickled banana peppers successfully the first time using these helpful kitchen tips.
- Choose fresh peppers. Select fresh, firm banana peppers for the best results. Avoid peppers that are beginning to show signs of spoilage.
- Remove the membrane and seeds. The membrane and seeds may make the brine taste slightly bitter. For the best flavor, remove the membrane and seeds before pickling banana peppers.
- Slice the peppers uniformly. Slicing the banana peppers uniformly ensures they will have a consistent texture and flavor.
- Don't boil the brine. Using brining liquid that is too hot can lead to mushy pickled peppers.
- Give the jars a shake. After sealing the jar, give it a gentle shake to make sure the brining liquid is evenly distributed among the peppers.
- Brine for at least 2 days. Allow the pickled banana peppers to brine for at least 2 days before enjoying them. The longer they sit, the more developed and flavorful they will become.
- Label and date the jars. It's important to keep track of how long the pickles have been stored in the refrigerator so you know how long you have to enjoy them.
What To Do With Pickled Banana Peppers
These savory pickled banana peppers add a tangy pop of flavor to a variety of dishes.
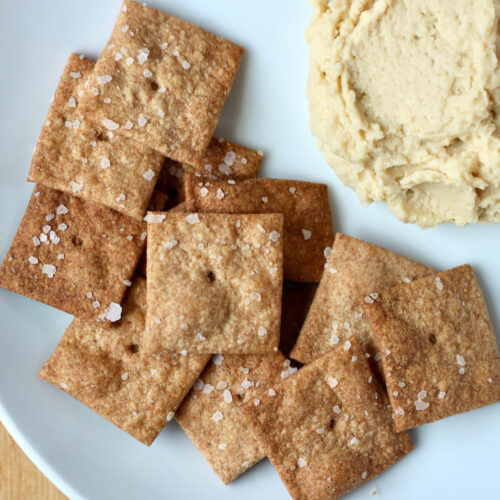
Homemade pickled peppers are a delicious snack. They can also be served as part of a charcuterie board spread or paired with wheat crackers, sourdough bread, or homemade hummus for a more satisfying treat.
A burger, sandwich, or wrap wouldn't be complete without the tangy addition of pickled garlic banana peppers. I always have these pickles handy when I'm serving turkey burgers and bagel sandwiches.
Finally, pickled banana peppers are the perfect topping for pizza, salad, nachos, and more. Add them to mushroom pizza, Caesar salad, pasta salad, or ground beef nachos for a unique flavor.

How to Store
- Refrigerator- Store pickled banana peppers in an airtight jar in the refrigerator for up to 6 months. Remember to label the jars with the preparation date and check for any signs of spoilage.
- Freezer- It is not recommended to freeze pickled banana peppers as this can alter their texture.
How to Tell If Your Pickled Banana Peppers Have Gone Bad
- Off Odor- If the pickles have a foul or unpleasant odor, this is a clear sign that they have gone bad. Pickled peppers should have a tangy, slightly acidic aroma.
- Cloudy Brine- If the pickling brine has turned cloudy, it could indicate bacterial growth and spoilage.
- Visible Mold- Visible mold growth on the surface of the pickles is a definite sign of spoilage. Discard the entire jar if you see any mold.
- Slimy Texture- Pickled banana peppers that have a slimy or excessively mushy texture have likely gone bad.
- Unpleasant Taste- If the pickled peppers taste sour, bitter, or otherwise unpleasant, it's a strong indication that they have spoiled.
Make Ahead
This quick pickled banana pepper recipe is perfect for preparing ahead because the peppers need at least 48 hours to brine before they're ready to enjoy. During this brining period, the peppers soak up the flavors and develop their tangy and aromatic taste.
🎁 Edible Gift Idea: Gifting a jar of homemade pickled banana peppers is a wonderful way to celebrate the holiday season, a friend's birthday, or any day of the week.

Frequently Asked Questions
No, banana peppers are not considered a spicy pepper, offering little to no heat and only containing about 500 scoville heat units.
Since this is a quick refrigerator pickle recipe, there is no need to sterilize the jars. However, you should always use a clean glass jar, utensils, and cookware to ensure your pickled banana peppers last as long as possible in the refrigerator.
Yes, you can adjust the recipe to make a smaller or larger batch. Just ensure you maintain the proper vinegar-to-water ratio in the brine and use an appropriate-sized jar.
If your brining liquid was too hot before pouring it over the peppers, this could lead to mushy pickles. For crunchy pickled banana peppers, heat the brine until it's steaming hot, but not boiling.
Pickled peppers last for up to 6 months or longer in the refrigerator when properly stored. However, their flavor and texture may change over time.
Let's Connect!
Be sure to leave a comment below if you have any questions. You can also connect with me on Instagram, Facebook, Pinterest, or via email at [email protected].

📖 Recipe

Pickled Banana Peppers
Ingredients
- 1 tablespoon kosher salt
- 1 teaspoon granulated sugar
- ½ teaspoon whole mustard seeds
- ½ teaspoon coarse ground black peppercorn
- 1 cup white vinegar
- ½ cup water
- 4 cloves garlic crushed
- 10-12 banana peppers
Instructions
- In a small saucepan, combine the kosher salt, granulated sugar, mustard seeds, and black peppercorns. Pour in the white vinegar and water, stirring to combine.1 tablespoon kosher salt, 1 teaspoon granulated sugar, ½ teaspoon whole mustard seeds, ½ teaspoon coarse ground black peppercorn, 1 cup white vinegar, ½ cup water
- Place the saucepan over medium-low heat and heat the mixture until it's hot but not boiling, making sure to whisk occasionally so the salt and sugar fully dissolve. Once hot, remove the saucepan from the heat and set it aside to cool slightly while you work on the peppers.
- Crush the 4 cloves of garlic and place them at the bottom of a pint-sized mason jar.4 cloves garlic
- Trim both ends of the banana peppers and use a small knife to remove the seeds and membranes. It's okay if a few seeds remain, but try to remove most of them. Slice the banana peppers into rings about ¼ to ½ inch thick.10-12 banana peppers
- Place the sliced banana peppers into the mason jar with the crushed garlic.
- Carefully pour the brining liquid over the peppers and garlic in the jar. Leave about a ½ inch of space at the top of the jar.
- Seal the mason jar tightly with the lid. Give the jar a good shake to ensure that every pepper ring is in contact with the brining liquid. Let the jar cool to room temperature on your kitchen counter.
- Once cooled, store the jar in the refrigerator. Allow the pickled banana peppers to brine for at least 2 days before enjoying. The longer they sit, the more flavorful they'll become. Pickled banana peppers will last up to 6 months or longer in the refrigerator.
Notes
- Choose fresh peppers. Select fresh, firm banana peppers for the best results. Avoid peppers that are beginning to show signs of spoilage.
- Label and date the jars. It's important to keep track of how long the pickles have been stored in the refrigerator so you know how long you have to enjoy them.
- Storage: Store pickled banana peppers in the refrigerator for up to 6 months (or longer). Freezing is not recommended.


Mich says
No comments?? Can't wait to try your recipe when my peppers are ready. Recipe sounds perfect - great blog article - very informative! Thanks so much!
Ashley Petrie, RDN, LDN says
Hi Mich! Thanks for being my first comment. 🙂 I can't wait for you to try them when your peppers are ready - mine are almost ready too. Come back and share how they turn out for you!