Sourdough Discard Pizza Dough
This Sourdough Discard Pizza Dough has a distinctively tangy flavor with an airy, open crumb and satisfyingly crispy texture. Made with no yeast and nearly two cups of unfed starter, this sourdough pizza crust is ready the same day and requires no kneading.
Servings 2 large pizza doughs
Calories 1264kcal
Ingredients
- 4 ⅛ cups (500 grams) bread flour
- 1 ¾ cups (400 grams) sourdough starter discard
- 1 ¼ cups (300 grams) warm water 80-90°F
- 1 ¾ teaspoons (10 grams) kosher salt
Instructions
- Mix Dough: In a large mixing bowl, combine the bread flour, warm water, sourdough starter discard, and kosher salt. Mix everything together until no dry flour remains and a cohesive dough forms. Cover the bowl and let the dough rest for 20 minutes.4 ⅛ cups (500 grams) bread flour, 1 ¾ cups (400 grams) sourdough starter discard, 1 ¼ cups (300 grams) warm water, 1 ¾ teaspoons (10 grams) kosher salt
- Stretch & Folds: After 20 minutes, lightly wet your hands with water. Gently stretch one edge of the dough up and fold it over onto itself. Rotate the bowl 90 degrees and repeat, stretching and folding the dough a total of four times. After the fourth fold, flip the dough over so that the seam side is facing down. Cover the bowl again and let the dough rest for 15 minutes. Repeat the stretching and folding process for a total of 4-6 sets or until the dough appears smooth and feels elastic.
- Bulk Fermentation: Cover the dough and allow it to rise in a warm environment (70-75°F, 21-24°C) for about 2 hours. Note that it may take more or less time to rise depending on factors such as the warmth of your kitchen, the activity level of your sourdough starter, and the age of your discard. The dough should double in size and have noticeable gas bubbles forming on the surface. If your kitchen is cooler, consider placing the covered bowl inside an off oven with just the light on to provide gentle warmth.
- Divide & Shape: Carefully turn the dough out onto a lightly floured work surface. Using a bench scraper, divide the dough into 2 equal pieces. Shape each piece by gently pulling the dough into a rough rectangle. Then, fold the top edge of the rectangle down towards the center, pressing lightly to seal. Repeat this process with the bottom edge, folding it up towards the center and pressing lightly to seal. Next, fold the left and right sides of the rectangle towards the center, overlapping slightly, and press lightly to seal. Finally, flip the dough over so that the seam side is facing down, and use your hands to gently shape it into a smooth, round ball.
- Proof: Place the dough balls on a lightly floured surface or parchment paper and cover them with plastic wrap. Let them rest at room temperature for 15-20 minutes before using them for pizza.
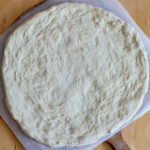
- Stretch: After proofing, you can use the dough to make pizza immediately. Alternatively, transfer it to the refrigerator for up to 4 days for a more tangy flavor or freeze it for up to 3 months. To stretch the dough, take one of the proofed dough balls and place it on a lightly floured surface or a piece of parchment paper. Gently press down about an inch from the edge dough with your fingertips to create a crust, working your way around the dough, to start stretching it into a round shape. Continue to stretch the dough by gently pressing and pulling the edges outward, rotating the dough as needed, until you've reached your desired size and thickness for the pizza crust. If the dough starts to resist stretching or springs back, let it rest for a few minutes and then continue stretching.
Video
Notes
- Measure ingredients by weight. For the most accurate and consistent results, measure your ingredients by weight using a food scale. If using measuring cups for flour, spoon it into the cup rather than scooping it from the container.
- Use enough flour while stretching. To prevent the dough from sticking to your hands or the work surface while stretching, dust lightly with flour as needed. This will make it easier to handle and shape the dough without tearing or sticking.
- Storage: Store dough in an airtight container for up to 4 days in the refrigerator or 3 months in the freezer.
- Make Ahead: The dough develops more flavor the longer it sits in the refrigerator and can be made up to 4 days ahead.
- Suggested Cooking Methods:
- Pizza Stone in the Oven- Preheat the oven with a pizza stone inside to 550°F. Build pizza on a pizza peel, then transfer the pizza directly to the hot pizza stone in the oven. Cook pizza for approximately 8-10 minutes.
- Sheet Pan in the Oven- Preheat oven to 500°F. Build pizza on the sheet pan, then transfer the baking sheet to the preheated oven. Bake pizza for 15 minutes.
- Grill Pan on the Grill- Preheat grill to 500°F. Build pizza on a grill pan, then transfer the grill pan to the preheated grill. Turn down the middle burner to medium-low to prevent the bottom of the pizza from burning. Close the grill lid and cook for 8-10 minutes.
Nutrition
Serving: 1whole pizza dough | Calories: 1264kcal | Carbohydrates: 254g | Protein: 42g | Fat: 6g | Saturated Fat: 1g | Polyunsaturated Fat: 2.5g | Monounsaturated Fat: 0.5g | Sodium: 2017mg | Potassium: 350mg | Fiber: 8.5g | Sugar: 1g | Calcium: 60mg | Iron: 15.4mg
Did you try this recipe?Let me know! Comment below, or take a picture and tag me on Instagram @everydayhomemadebyashley.