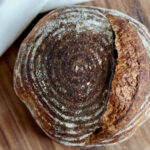
Dutch Oven Sourdough Bread
This No-Knead Dutch Oven Sourdough Bread is the perfect recipe for those just learning how to make sourdough bread. All you need is an active sourdough starter, bread flour, water, and kosher salt.
Servings 1 loaf
Calories 2017kcal
Equipment
- Banneton optional
Ingredients
- 500 grams bread flour
- 375 grams water 80-90°F (26-32°C)
- 100 grams active sourdough starter
- 10 grams kosher salt
- Oat flour or rice flour for dusting banneton
Instructions
- Note: I recommend a general timeline below to help you get an idea of how long the process may take. However, keep in mind that sourdough recipes are more of a guideline than a step-by-step process to follow. Temperature, humidity, and the strength of your starter all play a role in how long it will take your dough to rise. It's more important to pay attention to how your starter and dough look rather than the amount of time that has passed. "Watch the dough, not the clock." Please see the blog post above for helpful images associated with each step.
- Feed Sourdough Starter (8:00 AM): Feed your sourdough starter in the morning on the day you want to make your dough. My starter takes about 6 hours to become active and bubbly when it's stored between 70-75°F (21-24°C). This will vary depending on where you store your starter, but signs to look for include: bubbles breaking on the surface of the starter, the starter doubling or tripling in volume, and a slight doming at the top of the starter. You can also use the float test* to check if your starter is ready to be added to your dough.
- Autolyse (1:30 PM): About 30 minutes before your starter is ready, thoroughly mix together the flour and water in a large mixing bowl. Make sure you incorporate the dry flour as best you can, which takes a few minutes of mixing. After mixing, the dough will look rough and shaggy. Cover and allow to rest for 30 minutes or up to 2 hours.500 grams bread flour, 375 grams water
- Mix the Dough (2:00-2:10 PM): Once your starter is ready, add it to the bowl with the flour and water. Spread it across the top of the dough, then use your fingertips to "dimple" it into the dough. Pull the dough over itself a few times to begin incorporating the starter. Then, sprinkle the salt over the dough and continue to squeeze and fold until both the starter and salt are fully incorporated. This will take about 2-3 minutes.100 grams active sourdough starter, 10 grams kosher salt
- Stretch & Folds (2:30-3:50 PM): Allow the dough to rest for 20 minutes after mixing. Then, perform your first set of stretch and folds. Do this by dipping your hand into a bowl of cold water before grabbing one edge of the dough and pulling it up as far as it will stretch before folding it over onto itself. Rotate the bowl 90 degrees and repeat. Repeat this stretching and folding two more times (for a total of 4 times) around the dough. Cover and allow the dough to rest for 20 minutes before performing another set of stretch and folds. Perform 5 sets of stretch and folds total.
- Bulk Fermentation (4:00-8:00 PM): Cover the dough and allow it to rise in a warm environment (70-75°F, 21-24°C) for about 4 hours. Your dough is ready when it doubles in size, has bubbles forming on the surface, and jiggles slightly when the bowl is shaken.
- Pre-Shape (8:00-8:20 PM): Carefully turn the dough out onto a lightly floured work surface, taking care not to deflate any of the air built up inside of it. Gently pull the dough into a rectangular shape. Then, using your hands or a bench scraper, lift one of the short sides of the rectangle, folding it over itself and onto the middle of the dough like a letter. Repeat this fold on the opposite side of the dough. For the longer edges of the rectangle, you'll want to pull the edge of the dough out and up slightly before folding it down onto the middle. Repeat on the other long edge. Brush away any flour on the work surface before quickly flipping the dough over so the seam side is on the counter. Use your hands or a bench scraper to gently round out the dough into a ball. Cover and allow it to rest for 15 minutes.
- Final Shape (8:20 PM): Lightly sprinkle the top of the dough with flour, then flip it over so the seam side is facing up again. Repeat the same shaping method followed in the pre-shape step, building a little more tension in the dough this time. Allow the dough to sit seam-side down on the counter for 1-2 minutes before transferring it to a proofing basket.
- Proof (8:30-9:00 PM): Generously dust a 9-inch round banneton (or tea towel-lined bowl) with rice flour or oat flour. Quickly turn the dough into the prepared banneton so that the seam side is facing up. Pinch the seam closed with your fingers if it seems to be opening up at all. Cover and allow it to proof at room temperature for about 30 minutes.
- Cold Retard (9:00 PM-9:00 AM the Next Day): Transfer the proofed dough to the refrigerator to retard overnight. This step helps enhance the classic "sour" flavor of sourdough bread. It also helps the dough hold its shape in the oven.
- Preheat Dutch Oven (8:00-9:00 AM the Next Day): About one hour before baking, place your Dutch oven and lid inside of the oven and preheat it to 450°F (230°C).
- Score and Bake (9:00-9:50 AM): Gently turn your dough out onto a piece of parchment paper. Using a lame, razor blade, or sharp bread knife, score your bread about ½-inch deep. Carefully transfer your dough on the parchment paper into the preheated Dutch oven. Quickly cover the Dutch oven and place it back inside the oven. Bake the bread covered for 30 minutes. Then, remove the lid and bake for an additional 15 minutes uncovered.
- Cool (9:50-11:50 AM): Remove the bread from the Dutch oven and place it on a cooling rack. Allow the bread to cool for at least 2 hours before slicing.
Notes
- *Float Test: To check if your starter is ready to use, gently scoop a small amount of starter out of the jar and carefully add it to a glass of cold water. If the piece of starter floats, you're good to go. If it sinks, it may need more time or is past its peak activity and needs to be fed again.
- Quick Tip: Place your sourdough starter and bread dough in the warmest spot in your kitchen, but keep it out of direct sunlight. Next to your stovetop, on top of the refrigerator, or inside the oven with the light on are a few ways to keep your sourdough warm. Ideal temperature is around 70-80ºF (21-26ºF).
- Storage: Store a whole, uncut loaf uncovered at room temperature for 24 hours. After 24 hours, transfer the loaf to a plastic bag for an additional 2-3 days. After 3 days, I recommend storing the loaf in the freezer. Store a sliced loaf in a plastic bag for up to 3 days, then transfer it to the freezer for longer storage.
Nutrition
Serving: 1loaf | Calories: 2017kcal | Carbohydrates: 403g | Protein: 73g | Sodium: 4000mg | Potassium: 550mg | Fiber: 9g | Iron: 5.5mg
Did you try this recipe?Let me know! Comment below, or take a picture and tag me on Instagram @everydayhomemadebyashley.